Denny's Eddy
Here is a nifty flyer that can be made for pennies. It flys great in a gentle breeze and will do well in a good one when you add a tail. It makes a great Kids and family project that helps inspire the artistic and scientific side of the sport.
The Plan

Materials
The Sail- You can use a lot of things for the sail. Garbage bags (heavy duty), Space blanket, Newspaper, etc. basically any light weight easy to work with material.
The Frame- It takes one 48 inch long x 3/16 inch dia. hardwood dowel to make this kite. They are available at any hardware store or lumber yard.
The Dihedral- Now you know wat to do with all those extra wire coat hangers. It takes a 5 inch long piece for each kite.
Other Materials- Packing tape or clear Scotch tape, flying line which can be almost anything from kitchen string to actual kite string.
Building Instructions
Template- Make a full size template out ot construction paper or bristol board or something that is substantial. Lay it over your sail material and cut out the sail.
Frame- Cut the dowel into one 24 inch piece and two 12 inch pieces. Make sure the two 12 inch ones are exactly the same length. A good way to cut the dowels is to measure the length and then use a utility knife and roll the dowel under the blade and snap off. A little sanding and your set.
Dihedral- Take your 5 inch piece of hanger and find the centre. Bend it about 15 deg as per the diagram above.
Assembling the cross spars- Take the two 12 inch pieces and the dihedral and do a test fit as per the diagram above. You will find that the easiest way is to place the dihedral in front of the two dowels and bring the dowels together till they eet in the middle if the bend. At that point you can tape the one dowel to the dihedral. Bring the second one back in and tape it in place. I add a bit of tape over the joint of the two for reinforcing.
Placing the frame to the sail- I start with tying the vertical spar or spine (24 inch dowel) to the two 12 inch dowels with the dihedral attached tobether with a piece of kite string at the crossing point. The cross spar/dihedral is above the spine. A little white glue assures the string won't slip.
Lay the frame on the sail and place a piece of tape on the front of the sail at the tip just under the sail with sticky side up. Lay the spar in position and bring the tape up and over the end of the spar taping it in place. Repeat at the other end and at the wingtips and voila, the frame is taped in place. Note that you can leave the wingtips with the sail a bit loose. Just make sure each wingtip is equal to the other. The original Eddy kites were made this way.
To reinforce the spars to the sail I tape them at three locations. The first two are on opposite sides of the spine with tape across the cross spars and the third is half way betwoon the cross spars and the tail on the spine. This keeps the spars in place much better. Flip the kite over and pkace a piece of tape at the point where the two spars cross. Make a small hole through the tape so the bridle line can come through.
The Bridle- For the bridle line take a piece of string (9"-12" long) and stick it up through the hole you just made. wind it around the two spars where they cross and fasten securely. Tie a good sized knot approx 3 inch from the kite and cut off the excess. That string is what your flying line attaches too. That's it! you now have a kite to fly.
Extra Ideas
Before you assemble your kite you can decorate it with big bold graphics. Use what ever method works to get the graphics on. Just remember not to make the kite too heavy. Markers and paint work best. Adding a tail adds another level of excitement to your kite. Materials to use include garbage bags, surveyors tape, space blanket, etc. Anything that will take a bit of abuse as a tail gets whipped around a lot. Which ever you use make about 1 1/2 inch wide and approx. 15-20 feet long. Just keep it light so it floats on the breeze! You can tape the tail to the rear of the kite or make a string similar to the bridle that is tied around the spine approx 3/4 inch from the tail end. I have a small stick running across the top end of the tail that the tail is taped to and then I use a loop of string approx 6 inch long, centred on the stick,that I can Larkshead to the string on the rear of the kite. Makes the tail removable for easier storage.
This Kite is scaleable in size. You can make it as large as your material allows. I've made it in 30 inch and 48 inch sizes. Just keep the proportions the same and note at larger sizes you will have to increase the dowel size. For example I use 1/4 inch at 48 inch spans and two hanger dihedrals. Experiment, it's half the fun!!
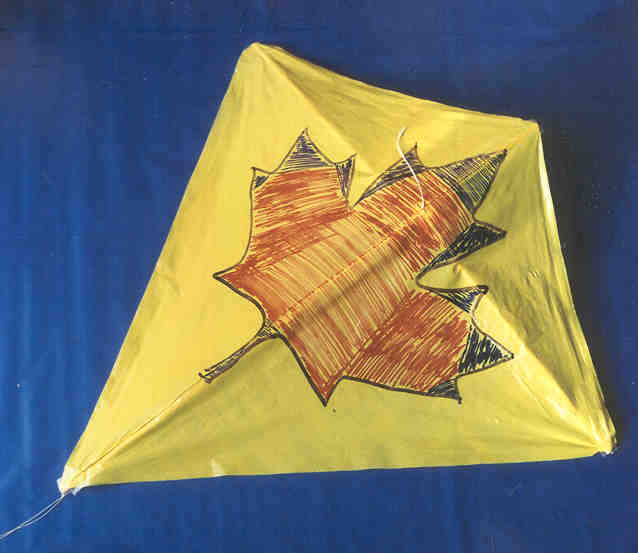
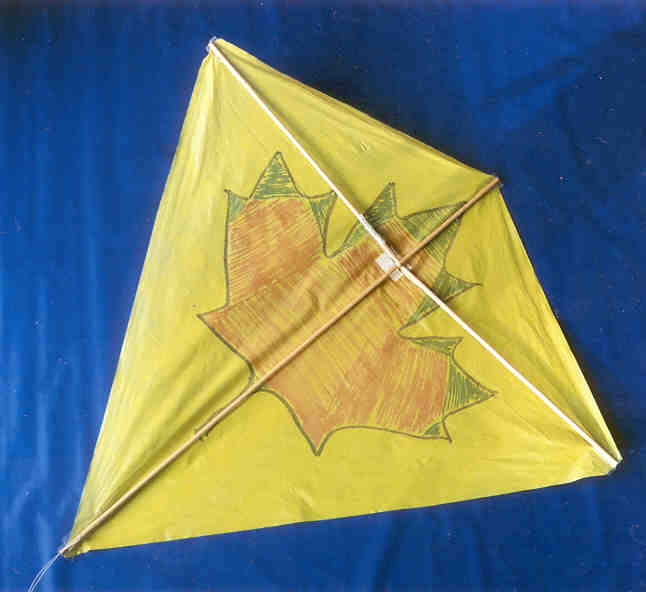
Here is a typical eddy from the front and the back.
Fly Safely
A word on flying kites safely.
The DON'TS- DON'T fly near power lines, trees, roads, people, buildings and other hazards. You should especially NOT fly in storms. Wet kite string conducts electricity amazingly well. Ben Franklin found that out really quick!. When walking over kite lines do NOT step on it. Finally DON'T fly anybody's kite without the flyers permission.
The Do's- Fly in a large unobstructed area (a soccer field is great!). Always beware of your surroundings. Also be polite and informative to other flyers and spectators. The more people you can include in flying kites the better!
FLY SMART, FLY SAFE AND
MOST OF ALL HAVE FUN!!!
This site has been modified on March 18th, 2021
|