
| Weaving In Ends | |
| Joining Modules to Make Pillow Center | |
| Homework | |
| Extra – Fancy Knit/Purl Variation |

I prefer to weave in yarn ends as I knit. That way, when I face the rat’s nest above, I know that all I have to do is trim the ends neatly, not spend time weaving in. For other types of knitting I’ll weave in ends by hand on completion, but for modular work I use a LOT of colors and if I had to weave in the ends by hand I know I’d have many, many UFOs. So, instructions follow for how to weave in ends as you knit. If you are of the "weave in by hand only" persuasion, by all means do so. You can jump right to the Joining Modules section.
| 1. | Begin at the right hand side of the Right (public) Side of the work on Row 3 of the Basic Module (you have cast on 30 stitches and knit 1 WS row ), *insert right needle into stitch on left needle as if to knit. With your left hand, lay the short tail end across the needle; with your right hand bring yarn around as if to knit the next stitch. |
|
|
|
| 2. | Before you pull the new stitch through, drop the yarn tail to the back of the work. Pull the new stitch through. Notice that in the photo the tail end is being moved back behind the needle; it is still crossed over the long yarn end. When you pull through the new loop, the tail end is held in position on the WS. |
|
|
|
| 3. | Knit the next stitch normally. The short tail end will be under the working yarn. Repeat from * 3 or 4 times, weaving the tail end over and under the working yarn. When you finish your project you can simply trim those woven-in ends. |
Begin at the right hand side of the Wrong (private) Side of the work on a purl row. *Insert right needle into next stitch on left needle as if to purl. With your left hand, lay short tail end across the needle; with your right hand bring yarn around as if to purl the next stitch.
Before you pull the new stitch through, drop the yarn tail. Pull the new stitch through. Purl the next stitch normally. Repeat from * 3 or 4 times, weaving the tail end over and under the working yarn.
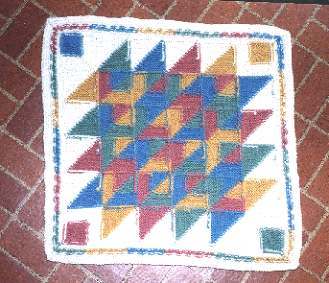
Below is a photo of the WS of the finished pillow with the ends trimmed.
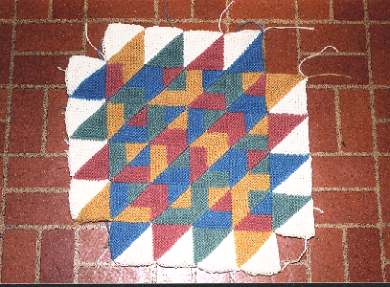
I join modules pretty much the same way Katherine describes in Lesson 2 of the Basic Pillow class so you may wish to review that section. However, I don’t bother with putting the last module stitch on a holder – I fasten off and when I need to pick up from that stitch, I just loosen the fasten off loop and pick up 1 stitch. Above is a photo of my pillow center. The corner squares (which are not intarsia) and the border are not shown (instructions follow in Lesson 3 for those units). Note that I refer to the rows of squares as "layers" so as to avoid confusion with "rows" in the basic module instructions.
LAYER 1. Begin at the bottom left corner (bluebell and white square). Make as for the basic module, casting on 15 stitches white, then 15 stitches bluebell. The next square (salmon pink and white) is made by casting on 15 stitches white (A) and picking up 15 stitches along white edge of previous square with salmon (D). Pick up stitches by knitting into the hole between the chain selvedge stitch and the main knitting stitch (loosen the fasten off loop of Square 1 and knit into it for the last pick up stitch). Complete square by following module instructions from Row 2.
The remaining two squares in this row (spring green and white, goldenrod yellow and white) are made the same way – cast on 15 stitches white and pick up 15 along the edge of the previous square using the appropriate color. It is important to pick up "corner to corner" – that is begin as close to the corner as you can, end as close to the next corner as you can. Incorporate the fasten off loop where you need to and bear in mind that the first decrease row helps to pull the mitered corner in, closing up any gaps.
LAYER 2. Begin at the left square (goldenrod yellow and white). Make as for the basic module BUT cast on 15 stitches goldenrod (color E), then 15 stitches white (A). Complete as for basic module from Row 2. To knit the next module (moving to the right), pick up 15 stitches with goldenrod (E) along top of very first module of row 1, then pick up 15 stitches with bluebell (B) along side of previous module. Continue as for basic module from Row 2, changing to colors D and C after you have worked 6 garter ridges (you will be at Row 13 of Basic Module). (If you have adjusted the size of your module, simply change colors after you’ve knit about halfway through the square). The next 3 squares are made the same way. Follow the photograph for the color changes. The last square of the row, spring green (C) and white (A), is made by casting on 15 stitches white (A), picking up 15 stitches spring green (C) from side of previous unit.
LAYER 3. Again, begin at the left square (salmon pink and white). Pick up 15 stitches salmon from the top of the unit below, cast on 15 stitches white. Complete square as for basic module from Row 2. The remaining squares are made by picking up 15 stitches from the module below, change color, pick up 15 stitches from the previous module. Complete square as for basic module from Row 2. Follow the photograph if you want to make the pillow the same as mine. Basically, I tried to make every square different (there are some repeats, can you find them?) . I used all 4 colors in the center squares (changing to new colors at Row 13 of Basic Module) and white and 1 contrast color for the end squares.
LAYERS 4 AND 5 are constructed in the same manner as Layer 3.
LAYER 6 (top layer). The top layer begins by moving in one square (leaving the corner square open for now). Pick up 15 stitches goldenrod (E) from the module below, cast on 15 stitches white. (A). Complete square as for basic module from Row 2. For the next square (spring green and white) pick up 15 stitches spring green from the module below, pick up 15 stitches white from the previous module. Complete square as for basic module from Row 2. The last two squares of the layer are picked up in the same manner with the appropriate colors.
Make your pillow center using two-color or four-squares (or try a combination of both types). Practise weaving in yarn ends on Row 3 of Basic Module instructions. Lesson 3 will cover the corners and slipstitch border.
Now that you know how to weave in ends as you knit intarsia squares, you can start to have fun.
 |
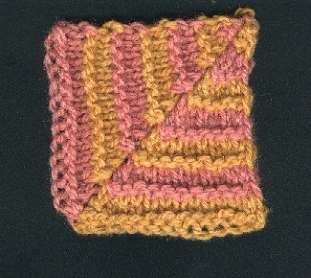 |
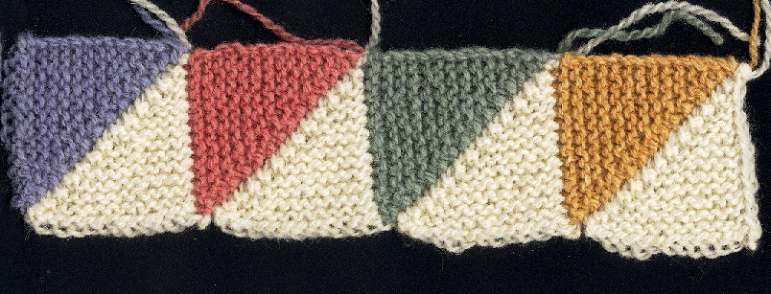
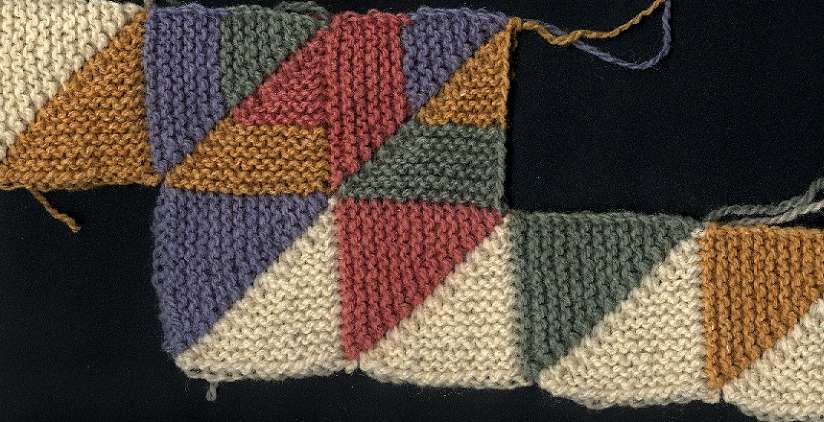
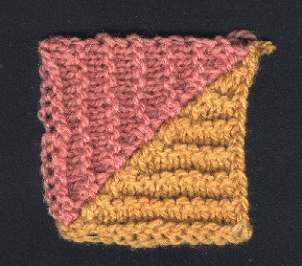
The photo on the left shows the knit/purl variation from Lesson 1. On the right, is the same square, but I’ve switched colors every 4 rows. So, cast on 15 stitches goldenrod (color E) and 15 stitches salmon (color D).
Row 2: (WS) With D, k 1 tbl, k 12, k 2 tog, cross yarns, with E k 2 tog tbl, k 12, yfwd, sl 1 p. (28 sts)
Row 3: (RS) With E, k 1 tbl, k 13, cross yarns, with D k 13, yfwd, sl 1 p. Up to this point the instructions are the same as for the Basic Module. The next 2 rows get fancy.
Row 4: (WS) With D , k 1 tbl, p 11, p 2 tog, cross yarns, with E, p 2 tog tbl, p 11 WEAVING IN COLOR D ON WRONG SIDE, sl 1 p. Color D is now in position to begin next row. (26 sts remain)
Row 5: (RS) With D, k 1 tbl, k 11 WEAVING IN COLOR E ON WRONG SIDE to middle of row. With E, k 11, yfwd, sl 1 p.
Continue in this manner, bringing yarn across to position by weaving it across row, and changing colors every 4 rows. Work your decreases in the middle of WS rows as usual. This is sort of fiddly, but you’ll amaze your knitting friends with how clever you are!
So, here’s the deal, if you choose to work your intarsia square in all garter stitch: on RS rows simply pull the new color into position across the Wrong Side of the work and hold it with your thumb. Weave in the loop as well as the tail end of old color as you knit across the row with the new color. If you choose to work your intarsia square with stockinette rows: on WS row previous to color change, carry the yarn to position by weaving it in around your purl stitches.
![]()
Modknit | Lessons | Intarsia Square Pillow Lessons | Intarsia Lesson 1 | Intarsia Lesson 2 | Intarsia Lesson 3 | Intarsia Lesson 4
![]()
Copyright November 2000 by Maureen Mason-Jamieson. All rights reserved. The material in this lesson is intended for your personal use only. It may be shared with others as long as it remains fully intact, including this copyright notice. It may not be sold, used to produce items for sale, re-printed or used on another webpage without written permission from the author.
![]()
Text and Images Copyright 2000-2004 Katherine Matthews (except where otherwise noted)
This page last modified 07 May 2017

