| Finishing Your Pillow With a Fabric Backing | |
| Pinwheels | |
| Purl 2 Together Joining Technique | |
| Extra |
My pillow remains unfinished for now because it will be easier to pack around as a teaching aid. After a while, it will be finished and "retire" gracefully to the sofa. I’ll use the fabric backing option to complete the pillow: you make the backing of 2 strips that overlap about 1-1/2" in the center. You can insert a pillow form easily and, more importantly, remove a pillow form easily when you want to wash the pillow. The math for figuring out the length and width of each strip is given below (it’s not difficult). Adjust to meet the needs of your pillow top.
My pillow is 18-1/4" square. Cut 2 pieces of fabric backing 19-1/4" x 11 ¾". The 19-1/4" is the width of the pillow top plus ½ " seam allowance on each side (18-1/4 "+ ½" + ½"). The 11-3/4" is arrived at as follows: divide 18-1/4 "by 2. This equals 9-1/8". You want a 1-1/2" overlap: 9-1/8" + 1-1/2" = 10-5/8". Don’t forget the ½" seam allowance on both sides! This brings you to 11-5/8". I’ve rounded up to 11-3/4" – I’ll eat up an extra 1/8" on the overlap.
Clean finish one long (19-1/4") side on each strip by turning under and pressing ¼"; then turn under and press ¼" again. Sew on a sewing machine with a straight stitch. You’ve enclosed the raw edge. Overlap the fabric strips, (the 2 clean finished edges overlap in the middle), so you have a 19-1/4" square. Pin the overlap at the side edges to hold in place.
Pin the knit pillow top (18-1/4" square) and the backing square (19-1/4" square) right sides together. You’ll see ½" of backing fabric all around. Using your sewing machine, sew the pieces together taking in a ½" seam allowance on the backing and sewing the pillow top in the rut between the bound off stitches and the last garter ridge. Use a smaller stitch at the corners to strengthen and get a good corner. Turn right side out. Insert pillow form of your choice.
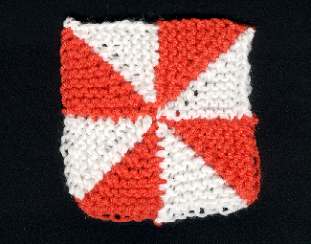
What if you want to make squares facing in different directions? In the pinwheel swatch above, the square on the lower left was made first. Cast on 10 stitches with orange, then cast on 10 stitches with white. Finish as for a basic intarsia mitered square. Knit the square in the upper left corner next. Cast on 10 stitches with white, pick up 10 stitches with orange along the top edge of square 1. Finish as for a basic intarsia mitered square. Next, knit the square in the lower right corner. This square is done a little differently. Cast on 10 stitches orange, then cast on 10 stitches white. Use a purl 2 together join to unite square 3 to square 2 (technique detailed below). Turn, continue making the square as for a basic intarsia mitered square AND, on Right Side rows, continue joining square 3 to square 2. For the final square, in the top right corner, pick up 10 stitches white from the top edge of square 3 and pick up 10 stitches orange from the side edge of square 2. Finish as for a basic intarsia mitered square.
The example below is worked in strips. I suggest you try this first before joining squares. Make a garter strip of 10 stitches in yellow using a chain stitch selvedge on both sides. Work 3-4" (enough to give you a chance to practise) then bind off all yellow stitches.
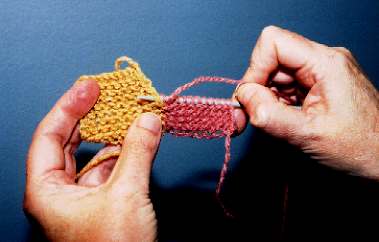
1. Cast on 10 stitches with pink. Insert your right needle between the first yellow chain stitch and the main yellow knitting PURLWAYS. The photo shows this step being done further up the strip.
2. Bring working pink yarn around needle as if to purl the stitch.
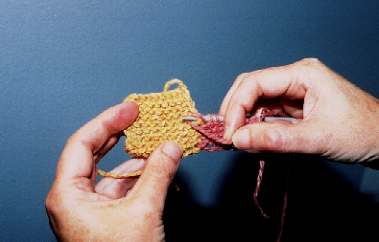
3. Pull new purl stitch through. Pass last cast on stitch (on subsequent rows, the slipped stitch) over the new purl stitch. The photo shows the new pink stitch with slipped stitch passed over it.
4. Turn, slip the first pink stitch KNITWAYS and work to the end of the row. The photo shows the wrong side of the work ; the first pink stitch being slipped.
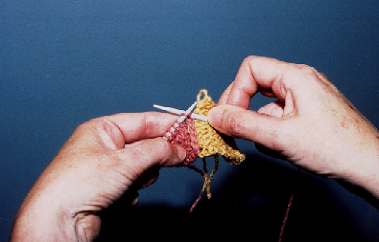
5. On subsequent Right Side rows work until one pink stitch remains on right needle. Bring your yarn forward and slip this last stitch purlways. Insert your right needle between the next yellow chain and the main yellow knitting purlways. Continue from Step 2.
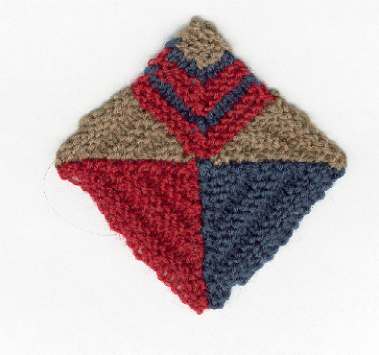
Why stop at one corner? The photo shows a 3-cornered intarsia square with a simple mitered square to finish. Can you see how it’s done? Cast on as for three 10 stitch x 10 stitch squares (60 stitches). The stitches are grouped as: 10 + 20 + 20 + 10. The 20 stitch groups form longer sides. Miter your corners just as you did for the basic mitered square module changing colors as desired.
Of course, you can add purl stitches, eyelets, stripes, whatever you like – drag some yarn out of your stash and play!
![]()
![]()
Copyright November 2000 by Maureen Mason-Jamieson. All rights reserved. The material in this lesson is intended for your personal use only. It may be shared with others as long as it remains fully intact, including this copyright notice. It may not be sold, used to produce items for sale, re-printed or used on another webpage without written permission from the author.
![]()
Text and Images Copyright 2000-2004 Katherine Matthews (except where otherwise noted)
This page last modified 07 May 2017