
| Corner Modules | |
| Slip Stitch Intarsia Border | |
| Homework |
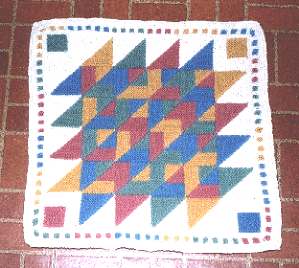
The pillow top is finished except for the corners and borders.
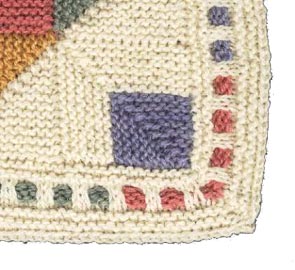
The corner modules are not worked in intarsia; they are simply mitered squares. Begin at the top right corner square: with white (A) and right side of work facing, pick up 15 sts from top of goldenrod/white square below, pick up 15 sts from side of adjoining bluebell/white square. Continue from Row 1 below.
Abbreviations:
| st(s) - stitch(es) | |
| RS - right (public) side of work | |
| WS - wrong (private) side of work | |
| k - knit | |
| p - purl | |
| k 1 tbl - knit one through back loop (insert righthand needle from right to left through the back of the loop on lefthand needle, knit this stitch) | |
| yfwd - bring yarn forward towards you | |
| sl 1 p - slip 1 purlwise (insert right needle into next loop as if you were going to purl it, don't purl, simply slip it on to the right needle) | |
| k 2 tog - knit two stitches together | |
| k 2 tog tbl - knit two stitches together through the back loop | |
| k 3 tog tbl - knit three stitches together through the back loop |
Row 1: (WS) K 1 tbl, k 13, k 2 tog tbl, k 13, yfwd, sl 1 p. (29 stitches)
Row 2 and all RS rows: K 1 tbl, k across row until 1 st remains on left needle, yfwd, sl 1 p. No decreases made. Note special instructions for Row 12.
Row 3: K 1 tbl, k 12, k 3 tog tbl, k 12, yfwd, sl 1 p. (27 sts remain)
Row 5: K 1 tbl, k 11, k 3 tog tbl, k 11, yfwd, sl 1 p. (25 sts)
Row 7: K 1 tbl, k 10, k 3 tog tbl, k 10, yfwd, sl 1 p. (23 sts)
Row 9: K 1 tbl, k 9, k 3 tog tbl, k 9, yfwd, sl 1 p. (21 sts)
Row 11: K 1 tbl, k 8, k 3 tog tbl, k 8, yfwd, sl 1 p. (19 sts) Cut yarn A leaving 3" tail.
Row 12: Join Contrast Color. K 1 tbl, k across row (weaving in yarn ends on WS 3 or 4 times) until 1 st remains, yfwd, sl 1 p.
Row 13: K 1 tbl, k 7, k 3 tog tbl, k 7, yfwd, sl 1 p. (17 sts)
Row 15: K 1 tbl, k 6, k 3 tog tbl, k 6, yfwd, sl 1 p. (15 sts)
Row 17: K 1 tbl, k 5, k 3 tog tbl, k 5, yfwd, sl 1 p. (13 sts)
Row 19: K 1 tbl, k 4, k 3 tog tbl, k 4, yfwd, sl 1 p. (11 sts)
Row 21: K 1 tbl, k 3, k 3 tog tbl, k 3, yfwd, sl 1 p. (9 sts)
Row 23: K 1 tbl, k 2, k 3 tog tbl, k 2, yfwd, sl 1 p. (7 sts)
Row 25: K 1 tbl, k 1, k 3 tog tbl, k 1, yfwd, sl 1 p. (5 sts)
Row 27: K 1 tbl, k 3 tog tbl, yfwd, sl 1 p. (3 sts)
Row 29: K 3 tog tbl. Fasten off.
Next, knit the bottom right corner square: with white (A) and right side of work facing, pick up 15 sts from side of white/goldenrod square, pick up 15 sts from bottom of adjoining white/bluebell square above. Continue from Row 1 above.
Then, knit the bottom left corner square: with white (A) and right side of work facing, pick up 15 stitches along bottom edge of goldenrod/white square; pick up a further 15 stitches along side edge of bluebell/white square. (30 stitches total).
Finally, knit the top left corner square: with white (A) and right side of work facing, pick up 15 sts from side of adjoining white/goldenrod square, pick up 15 sts from top of adjoining white/spring green square below. Continue from Row 1 above.
hree ContentsI worked the surrounding border in a modular fashion as well. That is, I picked up stitches along one side, worked the border section, and bound off all stitches. I did this for each of the 4 sides, then sewed the corner miters up neatly by hand. It was easier to see the intarsia slip stitches when using 90+ stitches spread out as opposed to 360+ stitches (90 x 4) scrunched up on a long circular needle.
Abbreviations:
| st(s) - stitch(es) | |
| RS - right (public) side of work | |
| WS - wrong (private) side of work | |
| k - knit | |
| p - purl | |
| m 1 – make 1 (increase 1 stitch by lifting the bar between the last stitch worked and the next stitch on to the left needle, from front to back. Knit this loop through the back) | |
| sl 2 – slip 2 stitches purlwise |
For each border section, with right side of work facing you, using white and 4 mm needle, pick up 90 stitches along one edge (15 stitches picked up for each square).
Row 1: (WS) P1, knit across row until 1 stitch remains, p 1..
Row 2: (RS) K1, m 1, knit across row until 1 stitch remains on left needle, make 1, knit 1. (92 stitches)
Row 3: As row 1.
Row 4: Knit.
Row 5: (WS) Purl. Drop white, but do not cut.
Row 6: (RS) Using 1 to 3 yard lengths of contrast color, K 1, m 1, *slip 2 stitches purlwise with yarn in back, k 2. Repeat from * across row until 3 stitches remain on left needle. End slip 2, m 1, k 1. (94 st).
Note: change contrast color after 3, 4, or 5 color "blocks" by dropping old yarn and attaching new length of another color. Cross yarns on WS of work (as for regular intarsia) behind the slipped stitches.
Row 7 and 9: P1 k 1, *sl 2 with yarn in front, k 2. Repeat from * across row , end sl 2, k 1, p 1.
Row 8: K 1, p 1, *sl 2 with yarn in back, p 2. Repeat from * across row, end sl 2, p 1, k 1.
Row 10: With white, work as for Row 2. (96 st) (Note you can weave in both ends of the contrast yarns on this row.)
Row 11, 12, 13: Work 3 rows of purl stitches, maintaining selvedge stitches in stockinette (k on RS, p on WS).
Row 14: K 1, m 1, purl across row until 1 stitch remains, m 1, k 1. (98 st)
Row 15: Purl. Next row bind off all stitches knitwise. When you have finished 4 border sections, sew corners together neatly by hand.
hree ContentsComplete your pillow top. In the next lesson, I’ll cover finishing your pillow with a fabric backing and show you another technique for joining squares that will enable you to join squares facing in different directions easily as you knit (think pinwheels).
hree Contents
![]()
Modknit | Lessons | Intarsia Square Pillow Lessons
| Intarsia Lesson 1 | Intarsia Lesson 2 | Intarsia Lesson 3 | Intarsia Lesson 4![]()
Copyright November 2000 by Maureen Mason-Jamieson. All rights reserved. The material in this lesson is intended for your personal use only. It may be shared with others as long as it remains fully intact, including this copyright notice. It may not be sold, used to produce items for sale, re-printed or used on another webpage without written permission from the author.
![]()
Text and Images Copyright 2000-2004 Katherine Matthews (except where otherwise noted)
This page last modified 07 May 2017