
A brief introduction: My name is Maureen Mason-Jamieson and I h**e intarsia. Well, perhaps h**e is too strong – let’s just say that after years of making pictures of puppy dogs and cartoon figures on the front of children's sweaters, I try, whenever possible, to avoid all but the most basic intarsia. So why am I so keen on intarsia mitered squares? Because you can achieve complex-looking intarsia using the most basic intarsia techniques and only 2 colors a row.
I first learned how to make these squares from Horst Schulz during one of his workshops. I’ve been avidly making modular garments since then and teaching his techniques to others. Mr. Schulz asked me to assist him during his recent workshop in Toronto, Canada and has graciously given me his permission to teach you some of his methods on the internet. His two books are now available in English and are an invaluable reference for modular knitters. The titles are: Patchwork Knitting and New Patchwork Knitting, Fashion for Children.
I made my pillow top using Shelridge Farm (www.shelridge.com) Soft Touch 100% Wool, a DK weight yarn. I used 1 skein each of the following colors: Color A – White, Color B – Bluebell, Color C – Spring Green, Color D – Salmon, and Color E – Goldenrod. This is enough yarn to make 2 pillow fronts. For needles, I used 4 mm (size 8 U.S.) in a 60 cm ( 24") circular for the border and 2 double-pointed (or short circular) for the basic modules. My finished pillow is 18-1/4" square; each basic square module is 2-1/2" across when joined to its neighbors and I added a 1-5/8" border all around. I made largish units to give you a chance to practice the technique and I made enough squares for the pillow top to give you an idea of what these nifty little units can do.
As you knit the module you will be creating a chain stitch selvedge along each side. This type of selvedge makes picking up stitches for the adjoining unit a snap. At the beginning of EVERY row, k 1 tbl. This twists the stitch.

Knit the next stitch normally and tug on your yarn end. This "tug" tightens the gap between the selvedge and the next stitch for a neater edge. Work across the row following the instructions below until 1 stitch remains on the left needle. Bring your yarn forward towards you. Insert the right needle into the last stitch as if you were going to purl it and gently slip it onto the right needle.

Why do you bring your yarn forward? So that it will be in position to knit the first stitch of the next row when you turn the work. If you forget to bring the yarn forward the first few times, don’t worry. All that happens is that your selvedge isn’t as neat and it’s more difficult to see where to pick up the stitches for the next square. It is so much easier to pick up stitches when you do this step correctly that you’ll begin to remember before too long. Stitches for the neighboring module are picked up by knitting into the hole between the selvedge stitch and the main knitting stitch.
I use a knit-on cast on for modular work. It creates a soft edge which will curve as the corner develops and it is easy to pick up stitches from this edge. It is loose and loopy-looking and therefore inappropriate for pieces where you want to leave the raw edge unfinished. The cast on uses two needles.
1. Make a slip knot in your yarn leaving a tail of 3 – 4". Place the knot on your left needle. Insert your right needle into this knot as if you were going to knit it. In the photo, note the short yarn end is being held out of the way in my left hand; the long yarn end is in my right hand.
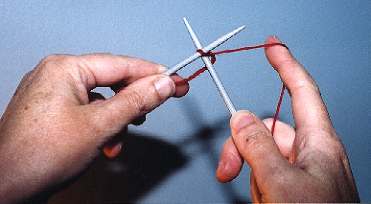
2. Using the long yarn end, bring yarn around as if you were knitting the stitch normally. Pull the yarn through making a loop on the right needle.

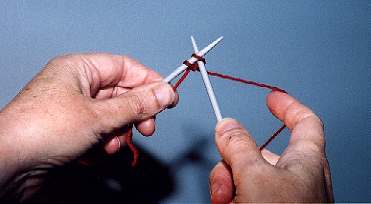
3. Place the loop on the left needle beside the slip knot. Insert the right needle into this new stitch and continue as above. Repeat for as many stitches as needed of your first color.
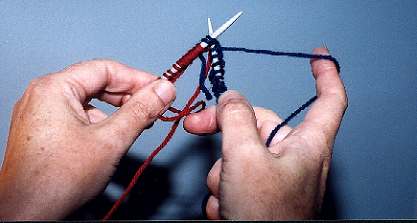
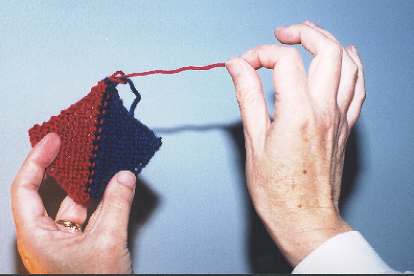
4. To join second color (navy), insert right needle into last loop on left needle as before. Make a small loop of the second color and place it around the right needle. Make sure the short end of the loop is on top.

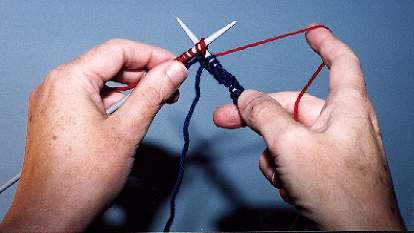
5. Pull the new color loop through and place it on the left needle. Cross yarns at back by holding old yarn (red) to the left and bringing new yarn (navy) up from under the old. Insert right needle into the last stitch on left needle as before. Repeat steps 2 and 3, using the new color, for as many stitches as needed. The photo shows the yarns crossed, the right needle inserted into the next loop, and the new color (navy) in position to bring it around the right needle.

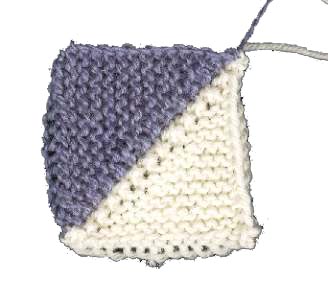
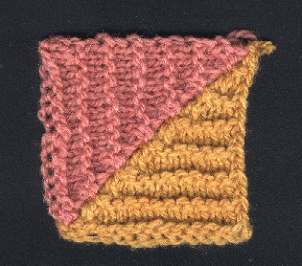
The basic modules are made using garter stitch. Not too fancy, but for the first few you’ll have enough going on without worrying about patterning too. A patterned version follows for the more ambitious at the end of this lesson. Things you need to know : these modules use a basic intarsia crossing technique when changing colors so as to avoid holes in the work. If you are new to intarsia, you may wish to consult an instruction book such as Reader’s Digest Knitter’s Handbook by Montse Stanley or Vogue Knitting by the editors of Vogue Knitting Magazine. Also, remember to work your chain stitch selvedge on EVERY row.
Row by row instructions are given below. However, the actual technique is pretty simple: on the Right (public) side simply knit across the row crossing the yarns when you change color in the middle of the row; on the Wrong (private) side of the work make your decreases. Decrease by knitting across to the 4 center stitches of the row (2 stitches color B, 2 stitches color A); knit 2 color B stitches together, cross yarns, knit 2 color A stitches together through the back loop. Finish the row. In the 3 photos below, color B is navy blue, color A is red.
Knit two color B stitches together.
Bring color B forward towards you and drop yarn, pick up color A from under color B, and move it back so it is in position to knit the next group of stitches. (This is a regular intarsia-type crossing to avoid holes in the work). In the photo, notice color B, navy, is moved towards the knitter; color A, red, is coming up from under navy.

With color A, knit two stitches together through the back loop.
| st(s) - stitch(es) | |
| RS - right (public) side of work | |
| WS - wrong (private) side of work | |
| k - knit | |
| p - purl | |
| k 1 tbl - knit one through back loop (insert righthand needle from right to left through the back of the loop on lefthand needle, knit this stitch) | |
| yfwd - bring yarn forward towards you | |
| sl 1 p - slip 1 purlwise (insert right needle into next loop as if you were going to purl it, don't purl, simply slip it on to the right needle) | |
| k 2 tog - knit two stitches together | |
| k 2 tog tbl - knit two stitches together through the back loop |
Row 1: Using 4 mm needles and using knit-on cast on, cast on 15 sts color A. Drop yarn (but do not cut). Cast on 1 st with color B, cross color A over color B at back (wrong side) of work, bring color B from under color A and cast on a further 14 sts. (30 stitches total – 15 color A, 15 color B). This counts as your first RS row.
Row 2: (WS) With color B, k 1 tbl, k 1 and tug yarn to tighten edge stitch, k 11. There are 13 color B sts on right needle; 2 color B sts remain on left needle. Knit these 2 stitches together. Cross yarns as shown in Basic Techniques section above. With color A, k 2 tog tbl, k 12, yfwd, sl 1 p. (28 stitches remain).
Row 3: (RS) With color A, k 1 tbl, k 13, drop color A. Bring color B up from under color A (crossing yarns), using color B, k 13, yfwd, sl 1 p.
Row 4: With color B, k 1 tbl, k 11, k 2 tog, yfwd. Cross yarns on WS, take color A to back. With color A, k 2 tog tbl, k 11, yfwd, sl 1 p. (26 sts).
Row 5 and all further RS rows: With color A, k 1 tbl, k to center of row, drop color A. Bring color B up from under color A, k across row until 1 st remains, yfwd, sl 1 p. There are no decreases on RS rows.
Row 6: With color B, k 1 tbl, k 10, k 2 tog, yfwd. Cross yarns, take color A to back, k 2 tog tbl, k 10, yfwd, sl 1 p. (24 sts). You will be decreasing 2 stitches (1 color B, 1 color A) each WS row.
Row 8: Color B, k 1 tbl, k 9, k 2 tog, yfwd. Cross yarns, take color A to back, k 2 tog tbl, k 9, yfwd, sl 1 p.
Row 10: Color B, k 1 tbl, k 8, k 2 tog, yfwd. Cross yarns, take color A to back, k 2 tog tbl, k 8, yfwd, sl 1 p.
Row 12: Color B, k 1 tbl, k 7, k 2 tog, yfwd. Cross yarns, take color A to back, k 2 tog tbl, k 7, yfwd, sl 1 p.
Row 14: Color B, k 1 tbl, k 6, k 2 tog, yfwd. Cross yarns, take color A to back, k 2 tog tbl, k 6, yfwd, sl 1 p.
Row 16: Color B, k 1 tbl, k 5, k 2 tog, yfwd. Cross yarns, take color A to back, k 2 tog tbl, k 5, yfwd, sl 1 p.
Row 18: Color B, k 1 tbl, k 4, k 2 tog, yfwd. Cross yarns, take color A to back, k 2 tog tbl, k 4, yfwd, sl 1 p.
Row 20: Color B, k 1 tbl, k 3, k 2 tog, yfwd. Cross yarns, take color A to back, k 2 tog tbl, k 3, yfwd, sl 1 p.
Row 22: Color B, k 1 tbl, k 2, k 2 tog, yfwd. Cross yarns, take color A to back, k 2 tog tbl, k 2, yfwd, sl 1 p.
Row 24: Color B, k 1 tbl, k 1, k 2 tog, yfwd. Cross yarns, take color A to back, k 2 tog tbl, k 1, yfwd, sl 1 p.
Row 26: Color B, k 1 tbl, k 2tog, yfwd. Cross yarns, take color A to back, k 2 tog tbl, yfwd, sl 1 p. (4 sts).
Row 28: Color B, k 2 tog tbl, yfwd. Cross yarns, take color A to back, k 2 tog tbl, yfwd, sl 1 p. (2 sts). Turn, k 1 tbl using color A, sl 1 p. Turn, pass slipped st over remaining st. Cut yarns A and B leaving 2-3" tails. Fasten off loosely bringing both yarn ends through fasten off loop.
The photo below left shows the WS of the module (note the crossed stitches at the center). The two ends of yarn are being brought through the fasten off loop. The photo below right shows the RS of the module with the fasten off loop tightened (but still loose enough to pick up a stitch from for a neighboring square).
|
WS of Module |
RS of Module |
 |
 |
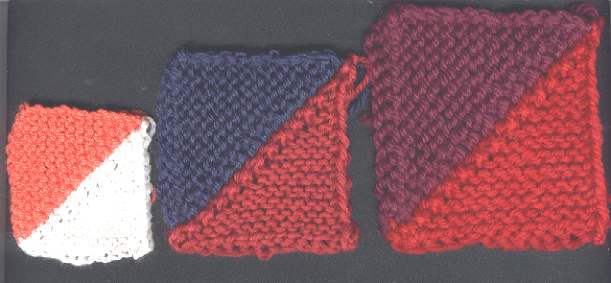
The size of modules may be adjusted in several ways. Using the same number of stitches, but different weights of yarn and appropriate size needles for those weights results in different size modules. Below, are 3 squares made using the garter module instructions . The left square is made of sock yarn and 3 mm needles, the middle square is made of double knitting (DK) weight yarn and 4 mm needles, the right square is made of knitting worsted (KW) weight yarn and 5 mm needles.
Or, you can also simply increase or decrease the number of stitches you cast on to begin your square. Knit your square decreasing 2 stitches every Wrong Side row as usual. Because you began with fewer stitches, you’ll finish sooner, resulting in a smaller square.
Make several basic modules in different sizes. Decide how big you want to make your pillow : how many squares across and how many rows of squares do you want? What size do your squares need to be to achieve this? I chose to make a large pillow with 6 rows of 6 squares across (36 squares total). Each square measures 2-1/2" when surrounded by its neighbors. A 1-5/8" border surrounds the pillow for a finished size of 18-1/4" across.
Try a variation of the basic module by alternating 2 rows garter and 2 rows stockinette. Note that on the 2 rows stockinette, your Wrong Side decreases will be occurring on a PURL row. Work to the centre 4 stitches, purl 2 stitches together, cross yarns, purl 2 stitches together through the back loop (insert your right needle from the back into the second stitch on the left needle, then into the first stitch; purl 2 together twisting the stitches). This last movement is a bit awkward-feeling (it helps to keep stitches loose before p2tog tbl, tighten stitches after knitting) but results in a discreet, left slanting decrease when viewed from the RS, so persevere.
![]()
Modknit | Lessons | Intarsia Square Pillow Lessons | Intarsia Lesson 1 | Intarsia Lesson 2 | Intarsia Lesson 3 | Intarsia Lesson 4
![]()
Copyright November 2000 by Maureen Mason-Jamieson. All rights reserved. The material in this lesson is intended for your personal use only. It may be shared with others as long as it remains fully intact, including this copyright notice. It may not be sold, used to produce items for sale, re-printed or used on another webpage without written permission from the author.
![]()
Text and Images Copyright 2000-2004 Katherine Matthews (except where otherwise noted)
This page last modified 07 May 2017