

This potholder uses two different units: a garter stitch square (based on the one in Ted Myatt’s Easy Garter Stitch Slipper pattern) and a mitred garter stitch triangle. The triangle is based on one found in the book Number Knitting by Virginia Woods Bellamy, but uses the same methods of decreasing for the mitre as in the garter stitch square.
The potholder has a definite right and wrong side, but if you're careful about working the ends in neatly, the wrong side will look more like a "design feature" <g>.
You can experiment with the weight of yarn and the number of stitches to create potholders of varying size. All you need to remember is that your cast on/pick-up rows for both types of units are based on 2X as the number of stitches.
For example, for my potholder, I used 15 to represent X. Therefore, I needed to cast-on or pick up 2X or 2(15) or 30 stitches, whether I was working a square or a triangle.
I used Anny Blatt No. 5 (wool) yarn and 3.5mm needles.
Another quick note: You will need to decide what to do with the final loop you’re left with when you knit one of the units. Generally, I leave them, and use them as part of the picking up/casting on process when I’m trying to build new units onto previous ones.
Okay, one more note: You’ll need to know which is the right side, so make sure you mark your units in some way. Always pick up/cast on with the RIGHT side of the work facing.
Abbreviations:
| K1b - knit 1 in back of stitch | |
| K3tog TBL- knit 3 sts together in the back of the loops | |
| sssk - separately slip 3 sts as if to knit, then knit them together as if through the back loops | |
| st - stitch | |
| sts - stitches |
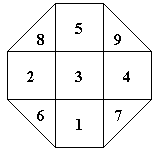
SQUARE ONE:
Cast on 2X stitches. This must be an even number, which it should be if your "X" value was a whole number.
Row 2 (wrong side): K1b, knit to 2 centre stitches, work k2togb or ssk. Knit to last st; yarn forward, slip last stitch as if to purl. You now have an odd number of sts on your needles.
Row 3 (right side): K1b, knit to last st; yarn forward, slip last stitch as if to purl.
Row 4: K1b, knit to 1 stitch before the centre stitch; K3tog TBL, or sssk; knit to last st; yarn forward, slip last stitch as if to purl.
Repeat rows 3 and 4 until there are 3 sts total on the needles; end completing a Row 4. Turn and work Row 3; turn and K3tog TBL, or sssk; put the remaining st on a holder.
SQUARE TWO:
Work Square One Again.
SQUARE THREE:
Pick up 15 sts along top edge of Square One.
Pick up 15 sts along right side of Square Two.
Work rest of Square Three as Square One beginning with Row 2.
SQUARE FOUR:
Cast on 15 sts.
Pick up 15 sts along right side of Square Three.
Work rest of Square Four as Square One beginning with Row 2.
SQUARE FIVE:
Pick up 15 sts from top of Square Three.
Cast on 15 sts.
Work rest of Square Five as Square One beginning with Row 2.
NOW WORK THE TRIANGLES:
In order to work the triangles, you’re going to have to turn your work, and keep turning it around. The triangles are picked up from the inside of the squares and worked to the outside edge.
TRIANGLE SIX:
Pick up 15 sts from bottom of Square 2, then pick up 15 sts from left side of Square One.
Row 2 (wrong side): K1b, k2togb, knit to 2 centre stitches, work k2togb or ssk. Knit to last 3 sts; k2togb; yarn forward, slip last stitch as if to purl. You now have an odd number of sts on your needles.
Row 3 (right side): K1b, knit to last st; yarn forward, slip last stitch as if to purl.
Row 4: K1b, k2togb, knit to 1 stitch before the centre stitch; K3tog TBL, or sssk; knit to last 3 sts; k2togb; yarn forward, slip last stitch as if to purl.
Repeat Rows 3 and 4 until there are 7 sts left (ending Row 4).
Next Row: K2togb, k3tog TBL, k2togb (3 sts remaining)
Next Row: K3tob TBL. Place loop on holder, or finish off triangle, as you wish.
TRIANGLE SEVEN:
Pick up 15 sts from right side of Square One, then pick up 15 sts from bottom of Square Four. Work as for Triangle Six from Row 2.
TRIANGLE EIGHT:
Pick up 15 sts along left side of Square Five, then pick up 15 sts from top of Square Two. Work as for Triangle Six from Row 2.
TRIANGLE NINE:
Pick up 15 sts along top of Square Four, then pick up 15 sts from right side of Square 5. Work as for Triangle Six from Row 2.
FINISHING THE POTHOLDER:
Here’s one method for finished the potholder.
Pick up 120 sts around the outside edge of the potholder.
Row 1: Knit
Row 2: Purl
Repeat Rows 1 and 2 twice more (for a total of six rounds), then cast off LOOSELY (preferably using a larger needle than you used to knit the border). Add a loop....you can use I-cord or just crochet a loop....
Advantage: You have a nice border around the edge of your potholder.
Disadvantage: It tends to pull the whole thing in, making it slightly concave. Mine is fine when it's laid down upon a flat service, but once I pick it up and starting playing around with it, it curves in.
Advantage: The curving in might be considered...oh....ergonomic? <g> Since the idea is to Put It In Your Hand to Pick Up Something Hot, I guess it might be okay to have it curve. But it likely won't hang nicely on a hook on your kitchen wall or cupboard or wherever you choose to put it.
![]()
Garter Square Instructions Copyright November 2000 by Ted Myatt . All rights reserved. Potholder Instructions and Images Copyright February 2001 Katherine Matthews. All rights reserved. This pattern is intended for your personal use only. It may be shared with others as long as it remains fully intact, including this copyright notice. It may not be sold, used to produce items for sale, re-printed or used on another web page without written permission from the author.
![]()
Modknit | What's New | Resources/Links | Lessons |Patterns | Process to Product
![]()
Text and Images Copyright 2000-2004 Katherine Matthews (except where otherwise noted)
This page last modified 07 May 2017