

My Mom has this pair of slippers that she carries around in a bag when she goes to somebody’s house and she wants something for her feet. They’re made from an assortment of garter stitch squares sewn together and when I was looking at them one day, I realized that modular squares would be the perfect way to make them. And you wouldn’t have to sew them together, either.
So here are instructions for a slipper, made following the construction approach of Mom’s pair. For different sizes, use smaller or larger squares. Somebody, somewhere, will have a chart that specifies the size of square to use for a differently-sized slipper. Let me know if you have that information.
Abbreviations:
| K1b - knit 1 in back of stitch | |
| K3tog TBL- knit 3 sts together in the back of the loops | |
| sssk - separately slip 3 sts as if to knit, then knit them together as if through the back loops | |
| st - stitch | |
| sts - stitches |
For Mom's slippers, each square is about 3.5 inches square. As I noted above, you'll get different sizes depending on the size of the squares.
Work a sample swatch in garter stitch to figure your gauge per inch (Number of stitches per inch).
Square 1
 |
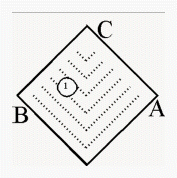
Row 2 (wrong side): K1b, knit to 2 centre stitches, work k2togb or ssk. Knit to last st; yarn forward, slip last stitch as if to purl. You now have an odd number of sts on your needles.
Row 3 (right side): K1b, knit to last st; yarn forward, slip last stitch as if to purl.
Row 4: K1b, knit to 1 stitch before the centre stitch; K3tog TBL, or sssk; knit to last st; yarn forward, slip last stitch as if to purl.
I suggest you mark the "right side" of your work so you know which it is.
Repeat rows 3 and 4 until there are 3 sts total on the needles; end completing a Row 4. Turn and work Row 3; turn and K3tog TBL, or sssk; put the remaining st on a holder. You’ve just finished point "C" on the diagram.
Square 2
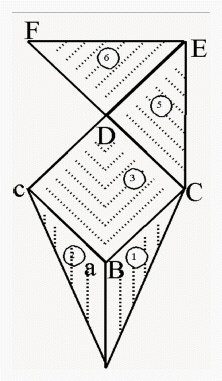
With the right side of the work facing you, and Point "C" pointing down, from Square 1, starting at "B" on the diagram, knit up 1 stitch in each stitch in the cast-on edge, giving you 2X sts by the time you’ve reached "A". Now work as for Square 1 from Row 2. We’ll call this square "a-b", with its end point being "c".
Square 3
 |
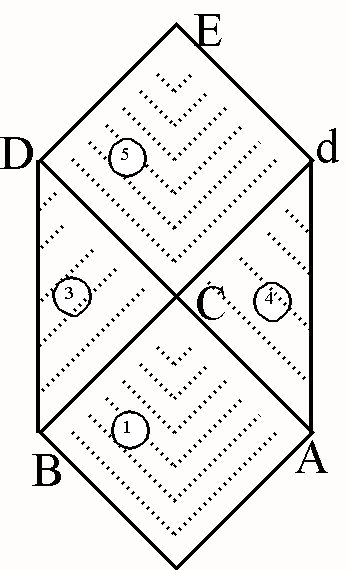
Flatten Squares 1 and 2 so they look like the diagram above, and then knit up 2X stitches working from "C" on Square 1 to "aB" and up to "c" on Square 2. At "C", put the stitch on the holder as the first stitch of the 2X count. Don’t include the stitch on the holder at "c" on Square 2. Now work as for Square 1, starting at Row 2, and put the last stitch ("D") on a holder.
Square 4
Turn the work over, and put the stitch on the holder at "c" on the needle, and knit up (X-1) stitches along the edge of Square 2 down to "Ab", and "X" sts up to "C" on Square 1; you should have 2X sts on the needle. Work as for Square 1 from Row 2; end putting the last stitch ("d") on a holder.
Square 5
Reshape the work so Squares 1 and 2 look like squarish diamonds and not triangles. This Square 5 will form the bottom of the heel of the slipper. See the diagram below.
Starting at "d" on Square 4, put the holder stitch on the needle and knit up down to "C" on Square 1, and up to "D" on Square 3. Remember not to put the holder st on the needle at "D". You want to have 2X stitches. Work as for Square 1 from Row 2. You will finish at point "E"; put the stitch on a holder.

|
Square 6
This is a bit tricky, but it will work.
Start at "d" and knit up X stitches along Square 5 to point "E". Put the holder stitch on the needle and knit up (X-1) sts down the edge to point "D". You should have 2X sts on the needle. Now work from Row 2 of Square 1. The last stitch is at point "F"; leave it on the needle to work Square 7. If Square 6 worked out fine, you can flatten your slipper so it looks like this:

|
Square 7
 |
With the st at point "F" on the needle, knit up (X-1) sts down Square 6 to point "D", and
"X" sts along the edge of Square 3 up to point "c". You will
have 2X stitches. Now work from Row 2 of Square 1 -- by now you've probably
figured that out, right? When you've finished that, draw your yarn through the last stitch and finish off the end.
Now flip the work over and work Square 8, starting at "c" on Square 4, knitting up sts down to "d' on Square 4, and up to "F" on Square 6.
If you knit in all the ends as you are working, you will have practically no
finishing of any kind to do.
You might want to finish the opening at the ankle somehow; maybe a bit of single crochet or applied I-cord around the tops of Squares 7
and 8. You can stitch the points down, or not. Finished!
![]()
Images and Instructions Copyright November 2000 by Ted Myatt . All rights reserved. This pattern is intended for your personal use only. It may be shared with others as long as it remains fully intact, including this copyright notice. It may not be sold, used to produce items for sale, re-printed or used on another web page without written permission from the author.
![]()
Modknit | What's New | Resources/Links | Lessons | Patterns | Process to Product
![]()
Text and Images Copyright 2000-2004 Katherine Matthews (except where otherwise noted)
This page last modified 07 May 2017