
The top of this tam is knit one triangle at a time (with no sewing afterwards!), then stitches are picked up from the edges of the resulting hexagon and the tam is knit from there down to the ribbing. A great pattern for using up yarn oddments and quite a bit of fun too!
Size:
To fit lady's size medium (21") (12 inches across top of tam).
Gauge:
15sts and approx 26 rows to 10cm over st st on 5mm needles. Row gauge
can be approximate since the pattern is written in inches not rows.
Materials:
Scraps of bulky weight wool in your choice of colours. Total approximately
150gms (or less if you're using acrylics or mohair)
20 inch 5mm circular needle or dpns
Pattern:
The top of this tam is knit one triangle at a time. You then pick up
the stitches for the next triangle and knit from there, joining edges whenever
they meet so there is no sewing when you're finished!
Top:
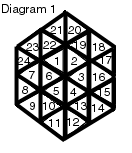
We'll begin with triangle number 1 as shown in the diagram on the right.
Cast on 15sts.
*Row 1: Knit
Row 2: P2tog, P to last 2 sts, P2tog
Repeat last two rows until 3sts remain, ending with a RS row: Slip 1, P2tog, PSSO
Hold your work with the cast on edge at the bottom and pick up 15sts along the left hand edge.
Repeat from * until you have knit 5 triangles. You'll now have a hexagon with a triangular shaped piece out of it.
Pick up 15sts along the edge of the last triangle you knit and work the last triangle as you did for the others, joining the end of every other row with the first triangle worked by picking up a loop on the side of triangle 1 and knitting it together with the last stitch of your row.
You'll now have a full hexagon shape!
Keep knitting triangles following the order in diagram 1 (if you hold your knitting with your last triangle up the right way you'll always be picking up your new stitches on the left hand side of each triangle), joining the edges of triangles wherever it's required. Keep going until you have completed 24 triangles and you should have a larger hexagon shape that looks like diagram 1.
Body:
Pick up 26sts along each side of your large hexagon (156sts) and knit
in the round for 3½ inches, working in one colour, or stripes as
you choose..
Decrease round 1: * (K1, K2tog, K2, K2tog) twice, K1, K2tog, repeat
from * to last 6 sts K2, K2tog, K2 (110sts)
Decrease round 2: *(K2tog) 3 times, K1, repeat from * 15 times, K2tog
twice, K1 (63sts)
Work 1½ inches in K1, P1 rib, (I worked 3 rounds of each colour) decreasing 1 st on the first round.
Cast off loosely in rib.
Making up: Darn in all loose ends except those in the exact centre of the top. Push these through to the right side of the knitting, tie in a knot and plait neatly.
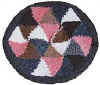
Colour Schemes:
I coloured my tam randomly but you can have a lot of fun making different
designs on the top of yours just by changing the colours of each triangle!
 |
 |
 |
 |
Click here for a page of 15 hat grids that you can print and colour in for your own choice of colour scheme.
![]()
Images and Instructions Copyright © 1999-2001 by Sarah Bradberry (to see more of Sarah's patterns, both modular and conventional, visit her site at http://www.knitting-and.com. All rights reserved. This pattern is intended for your personal use only. It may be shared with others as long as it remains fully intact, including this copyright notice. It may not be sold, used to produce items for sale, re-printed or used on another web page without written permission from the author.
![]()
Modknit | What's New | Resources/Links | Lessons |Patterns | Process to Product
![]()
Text and Images Copyright 2000-2004 Katherine Matthews (except where otherwise noted)
This page last modified 07 May 2017