
This square will form the basis for the first workshop in modular knitting.
We'll start with a sample square, using a single colour of yarn, so that you can see what's going to happen, and you can master the techniques without having to worry about managing two strands of yarn.
The pattern we'll be using for this workshop comes from a modular stocking pattern I've been test knitting for List Uncle Ted Myatt. Ted has been doing a great deal of exploration of techniques used for modular knitting (most notably in the works of Horst Schulz), and is working on patterns for modular knitting which reflect a creativity in using and combining various modules as well as a certain refinement and elegance of technique.
Ted has graciously granted me permission to use his garter welt module as written in his upcoming stocking pattern -- it's similar to one I've taught before, however, he uses a different cast-on than I've used in the past, slipped edge stitches to make it easier to pick up stitches when adding additional modules -- in essence, his version is slightly more refined than anything I've taught before.
Ted Myatt "Diagonals 'n' Diamonds" Stocking Pattern (available soon)
Horst Schulz Das Neue Stricken Kindermode (Augsberg,Germany: Augustas Verlag, 1997. ISBN 3-8043-0501-6) -- pp. 10 and 11 show the garter welt square as well as a number of variations -- instructions are in chart format, and are more useful for those who already have some understanding of and experience knitting mitres.
For the Trial Module: Worsted Weight yarn in a single colour (you can use variegated if you so wish, I just don't want you to start with two different strands of yarn).
Needles: Size 4.0mm to 5.00 mm, depending what will give you a nice fabric. You want the square to be firm, and not loose, but not so firm that it is inflexible.
We're not going to be concerned about it for this module -- it'll be important when you're working on a garment, but if your final pillow product in this case is a little larger or a little smaller, it won't matter a great deal.
You may have a favourite cast on, and you're free to use it here. I used to use the cable cast on until I started test-knitting Ted's stocking pattern. In it, Ted recommends using the backwards loop cast on. I'll confess, I was skeptical at first -- It's a really loose cast-on, and my edges looked sloppy…..but only at the beginning. The extra yarn in the cast-on loops are a great advantage when you are going to pick up stitches to add on a new module. Hey, you're here to learn, right? Might as well give it a whirl...
Just in case you're not sure how to do it, here are some pictures to help….note that I use my index finger to create the loop -- many sources tell you to use your thumb to do this, I just find it less awkward with my index finger. The results are the same……
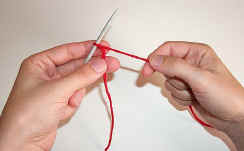 |
Make a slip knot and place it on your left-hand needle. |
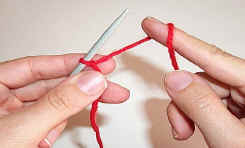 |
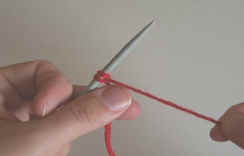
Hook your finger under the working yarn and form a loop (it will look a bit like the letter "e" when you form it). |
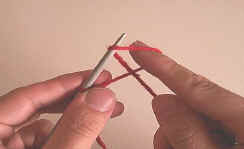 |
Place the loop over the needle. |
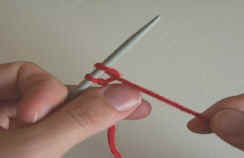 |
Pull the yarn..... |
 |
....so the loop is snug. Then repeat this process until you have the number of stitches you need. |
![]()
Modknit | Lessons | Lesson 1 | Lesson 2 | Lesson 3 / 3a / 3b | Lesson 4 | Lesson 5
![]()
Text and Images Copyright 2000-2002 Katherine Matthews (except where otherwise noted)