The subject of stems has generated more questions than any other topic, so I have put together a comprehensive explanation of each step of the process. This section is lengthy because it covers in detail all of the alternate choices you can make regarding stems as well as a lot of tips and tricks, but hopefully, it contains answers to all the questions you may have regarding stems.
Three points to note before we get going: first, any design related points are intended specifically for the John Winters' designs offered through Green Valley Boat Works. These design considerations may or may not apply to other designs. For example, John's designs are NEVER intended to have external keels (and THAT is a whole 'nother subject!) so the stem designs are not intended to work with any kind of projecting external keels.
Second, the general method of designing and constructing the stems follows the methods described in Ted Moores' Canoecraft, with the exception of the keels, of course.
And third, all comments and directions about stems apply equally to the bow stem and the stern stem. The stems differ only as much as the size and shape the hull differs. For reference purposes, the stem cross sections shown on our plans apply to both the bow and the stern.
The topic of stems is broken down into the following subsections. We recommend that you read the entire chapter at least once before starting your stems.
- wood selection:
- inside & outside stems vs. single stems:
- stem length:
- tapered or straight:
- cutting the laminations:
- bending:
- glue selection:
- gluing the laminations:
- tapering:
- bevelling:
- fitting outside stem:
- fairing outside stem:
- cutting down the inside stem:
For strength and durability, the most common choice is white ash. Almost any other common hardwood can also be used, such as cherry or the black walnut you see on my canoes. The walnut is a very handsome complement to the darker stained hulls I like. Some woods are heavy and or difficult to work, such as oak, and I would avoid them. If you want to reduce the weight, you could use cedar, but bear in mind that there will also be a reduction in strength and durability. Keep in mind how the canoe is intended to be used, and decide for yourself whether weight or durability is more important.
One or two weight fanatics we know used balsa, but this is getting pretty far out there, and personally I don't recommend it. These boats had so much fiberglass and resin to strengthen the inside of the stem that they looked very unsightly, and were probably heavier than if they had just used cedar without all the extra 'glass reinforcing.
Inside & Outside Stems vs. Single Stems:
The main benefits of using a one-piece or 'single' stem are reduced labour and reduced weight. Keep in mind that the stem stations on our plans must be cut to the middle profile line, which is identified as "...Stem Mould Line only if NO Outside Stem". The downside of the one-piece stem is that the softer wood strips of the hull will form the outside edges of the bow and stern and are more susceptible to suffering dents from wear and tear. For sea kayaks, most designs look best with fairly sharp ends, and the insides are not visible, so in this case, most people use just a single stem, and reduce the leading edge width of the stems to a very narrow edge.
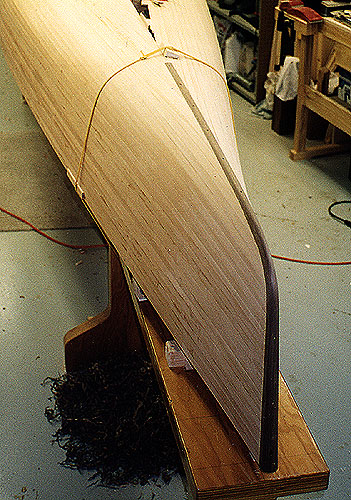
On the other hand, the two-piece stems result in a very handsome and durable hardwood 'cap' over the ends of the strips. It enhances the appearance of the boat and shows off your craftsmanship. There isn't a great deal of extra weight, because most of the wood in the outside stem will be planed and sanded away as it is faired into the shape of the hull.
Our canoe plans show the stems extending all the way to the third station along the keel line. Alternately, you can end the stems at the second station, or anywhere in between. The longer length is simply my personal preference for aesthetic appeal - I think it looks great on these sleek canoes. However, the choice is yours.
John's canoe designs usually include tapered stems, that is, they get wider towards the sheerline or gunwales. To my eye, this treatment looks very nice, and is in tune with the continuous end-to-end flare in the hull shape.
If you want to save a few ounces, or if the taper has no place in your vision, you can make the stems straight-sided. However, you will probably find that the first few stations will have to be modified a bit as you fair the mould, so that the sheerline flows smoothly and continuously to the tops of the now-narrower stems. When you modify the stations, don't just remove a little material at the sheerline, but cut back the entire straight part of the side of the stations from the sheer down, to blend smoothly into the curve of the bilge. The first station will need the most work, the second a bit less, and so on, until the mod flows back smoothly into the shape of the hull about a third of the way back on the hull. Make sure that the left and right sides of each station remain identical. For straight stems, the wood laminations must start out at 1" wide x 1/4" thick.
Once you reach the point where you shape the stems, most likely with a small block plane, it will be very helpful if the grain in each lamination is oriented exactly the same way to avoid any planing difficulties. The easiest way to achieve this is to cut all the laminations out of one piece of wood which is thick enough that the laminations "stack up" in the board. Mark the pieces on the edges to let you keep the laminations in the correct order and orientation. This also enhances the appearance, since the grain and colour will match between the layers.
The thickness of the laminations should be dressed to 1/4" with a thickness planer. If you are making tapered stems, the starting width should be 1 5/8". If you are making straight stems, start with 1" width. For the length, it's best to start with a little extra which comes in handy later. If you are going to go to the third station as shown in our plans, start with at least 60 inches length. Or, if you are only going to the second station make them 48 inches long. For each two-piece stem (bow and stern), cut 6 layers. For each one-piece stem cut 4 layers. If the board you are using is thick enough, you can cut an extra layer for each stem which will be used to protect the other strips from being dented by the clamps during the bending process.
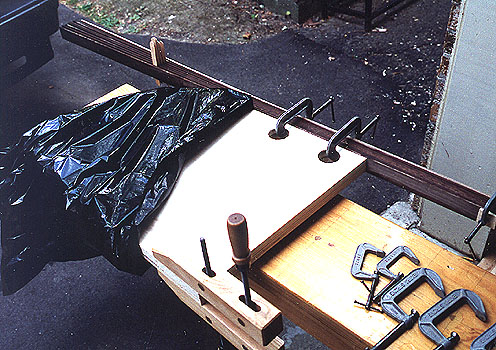
The key to bending the laminations is heat and moisture, which is usually applied by steaming. Alternately, you can use a 4" ABS pipe capped at one end, to soak the wood for a few hours, and then once the wood is clamped and ready to bend, pour boiling water right on the point of the sharpest bend, and then immediately make the bend. In either case, the key is that the wood must still be very hot and wet at the bend - you can't let it get cool while you're getting ready. The way to do this is to have all the strips for one stem set (inner and outer) pre-aligned and loosely bundled with string during the steaming or soaking process. Then, take the bundle and clamp it to the stem mould along the keel portion (say between station 1 and 3) with two clamps. Leave some excess sticking out a few inches past where the stem will end. (More on this in the next section.) Note that the hot, wet wood can easily be dented permanently by the clamps, so use an extra scrap of wood as padding.
Now that the bundle is securely clamped, separate the strips right at the bend-to-be with coffee stir sticks, cover the stem mould underneath with a plastic garbage bag over the mould so that it doesn't get wet. Lay the assembly on it's side so that you can pour the water in between the laminations, and then s-l-o-w-l-y pour two full kettles of boiling water (about 4 to 6 quarts) directly on the bend area. Immediately after pouring all the water on, pull out the stir sticks, set the whole assembly upright, preferably clamped to the bench in a vise, and slowly but firmly make the bend. Basically, the key is to be all set up so that you can proceed to the bending very quickly after the hot water has been applied.
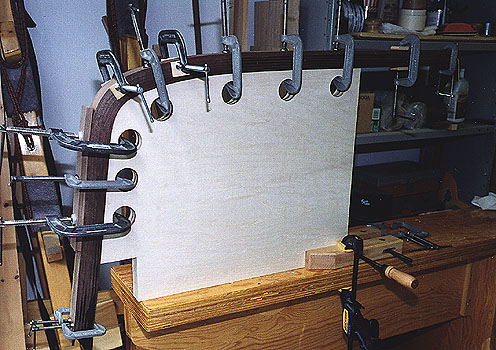
Now here's a trick: in order to force the individual strips TIGHTLY against each other at the bend, do an initial bend about half way and then clamp the free ends of the strip bundle tightly together with two 2" C-clamps. Then, as you force the bundle to bend as far down as you can, you will see that the inner strips are forced VERY tightly against the outer strips. Push the bundle down until you can 'capture' it with a 3" or 4" C-clamp (with scrap wood to pad the stems) and pull it in snugly against the mould. Begin easing off the 2" clamps at the stem ends as you have to to complete the bending and clamping of the bundle. A really good alternative to the 3" or 4" C-clamp referred to above is a 6" Quick-Grip Bar Clamp, made by the makers of the Vise-Grip. It has padded jaws and greater range to cature the stem bundle and pull it into place around the bend. Once the bend is complete, apply C-clamps at each remaining position, and also use smaller clamps to hold the ends of the bundle of laminations together where they stick out past the ends of the stem mould.
If your first attempt to get the hang of it is not entirely satisfactory, you will at least see the effects I'm trying to describe. Then, just remove the bundle, and soak and steam it again. And yes, you MUST do the inner and outer stem strips all at one time.
Now, we come back to that extra few inches of stem material you left sticking out past the ends of the stem mould. This extra portion allows you to drill a 1/4" dia. hole through the bundle at each end after it is bent and dried, but BEFORE you undo the clamps. Later, when you are applying the glue to the strips, they become slippery and tend to slide out of position as you are trying to apply the clamps. With these 1/4" holes, you can use wooden dowels to hold all the strips together as you are gluing them, without having them slide all over. After the stems are dry, you saw off the extra portion. Save the sawed off pieces for later if you will need to make plugs to plug screw holes in the stems. This method also gets rid of any sniping which may have occurred during thickness planing of the stem strips. Also, BEFORE you undo the clamps, draw a reference line across the sides of the laminations even with the end of the stem mould along the keel line to allow you to position the laminations back on the stem mould for gluing exactly in the same position as they were during bending.
One additional point: if you are making tapered stems, you may find it helpful to double up the thickness of the stem moulds to better support the wider stem strips during bending and gluing. After those steps, revert to a single thickness for setting up the mould on the strongback.
Don't use epoxy for gluing stems - it's unnecessary overkill, and not worth the added difficulty. Since the stems will be totally encapsulated in glass and epoxy later, they will never get wet. Use the same wood glue that you're going to use for gluing the strips. Nearly any wood glue will do, but I especially like 202 GF from Lee Valley Tools.
After bending, the stem strips must be completely dry before you glue them. In fact, because of the drying time, you should normally bend these strips before you start cutting out the rest of the stations, so that they can dry while you're doing other things.
With a two-piece stem, take care to apply the glue at only four joints, between the first and second and third strips, and between the fourth, fifth and sixth strips, thus creating the inner and outer stems. Do NOT glue the third and fourth strips together. Also, if you are using an extra piece to provide padding for the clamps, take care not to glue it to the rest. The wooden dowels will hold the entire bundle together as you clamp it back to the stem mould.
With a one-piece stem consisting of three layers, you will apply the glue at the two joints between the layers. Don't worry about a little glue squeeze-out as you clamp the strips, as the sides of the stem will later be planed down smooth regardless.
When trimming the upper end of the stem (the end by the gunwales) it's best to leave them about 1" too long until after the hull is off the mould. You can use this extra portion as a spot where you can drive a screw through to hold the stem in place on the mould, which saves the inconvenience of yet another C-clamp you have to work around. Also, it lets your fiberglass and epoxy run past the eventual cut off point, allowing you to trim the stems perfectly and cleanly to the correct line once the hull is off the mould, saving you a bit of extra labour by not having to sand the lumpy bits.
If you are making tapered stems, you will have started out with strips that are 1 5/8" wide. The shaping of the stems is a two step process, starting with the taper, and finishing later with the bevelling. Note that both the inside and outside stems must be tapered equally, and that this is done before the stems are set up on the mould. After the stems have been tapered, the entire portion along the keel line should be a nice, smooth, uniform 3/4" wide, even along the centerline. As the stem flows around the turn toward the 'vertical' portion leading towards the sheerline, it gets progressively wider, ending at 1 1/2" wide at the sheer. The sides of this tapered section should be a straight line from the 3/4" wide portion to the 1 1/2" wide part - make certain that the sides are not convex, concave or irregular.
Note that this tapering work cannot be easily done with the stem on the station mould. What I recommend is to lay the stem on it's side on the strongback, and use the stongback as a Japanese-style planing bench. You straddle the bench, sitting on one end of the stem to hold it while working on the rest with a small plane.
To guide this work, it is necessary to mark out the portions to be removed. It is usefull to have a semi-flexible 36" steel rule or similar for this. You begin by drawing a straight pencil line all the way from end to end along the centerline of the outside curve of the stem. Next, measuring out from the centerline, draw a parallel line 3/8" on either side along the keel portion of the stem, giving you the 3/4" width for that part of the stem. Last, mark out the 1 1/2" width at the sheer, and use the steel rule to connect those points together with the 3/4" lines at a point about half way 'round the bend. This process can be awkward, but it's not too hard if you use a couple of small C-clamps to hold the rule in place while you draw the lines. Then alternating side to side, plane the stem down to the lines, taking off the last little bit with a sanding block. The planed sides will be perfectly square to the outside faces at this stage - the bevelling comes later. Remember that on the keel-portion of the inner stem, these sides will be visible in the finished boat.
A good, timesaving trick is to temporarily screw the two pieces together to allow the two pieces to be planed at the same time. This method also helps if you are intending to use the same screws to help install the outer stem after the hull is planked. You must use screws no more than 1 1/4" long, and drill very carefully so that no screws penetrate to the inside of the inner stem. The screws must be exactly on the centerline, and you must place them where they will not interfere with screws from a brass stem band, should you decide to use one.
The screws in the stem band would of course be visible in the finished boat, so nice spacing is important. In any case, even with long stems, you shouldn't need more than a half dozen or so screws per stem. Don't use bigger than a #6 round head screw, and they don't need to be brass or stainless, because they won't be left in the finished canoe. Later on, after the outer stem has been installed, remove the screws, fair the stem, and then drill out and plug the screw holes with matching plugs made from the cut-off ends of the stems which you saved (remember them?).
This topic probably causes more confusion and questions than anything else to do with stems. Canoecraft covers this fairly well, but here we shall try to get into more specific details as it pertains to John's designs.
The process of bevelling the stems is quite simply a matter of shaping them so that the strips of the hull planking contact the stems against a flat surface so that they can be glued in place. Since the strips approach the stems at an angle, they would contact the stem on a corner rather than a flat. And so, it is necessary to plane the point of contact on the stem to match the angle of the strips at that point. That angle changes somewhat from one point on the stem to another, so the angle of the bevel is continuously changing. Ted Moores calls this a 'rolling bevel', and that's a fairly apt description.
In order to know what that angle must be, it is necessary to do the bevelling once the entire mould has been set up on the strongback and the inside stems are clamped into position. (Before fitting the stems to the mould, finish sanding, rounding edges, and marking serial numbers on the inside of the stem - it's a lot easier to do at this stage than later!) Actually, bevelling the stems is a part of fairing the mould ("Fairing" is covered in another chapter). Basically, you lay a batten or a nice straight piece of cedar strip along the mould just the same way as it would lie in the finished hull, and you note the angle at which it contacts the stem. That is the angle to which the stem must be bevelled at that point. You do this at least every few inches along the stem, always making sure that the batten is positioned parallel to the lines of the planking which will follow. In John's designs, the planking is typically parallel to the sheerline.
Another way to visualize this concept is a little mental trick I use. Imagine the shape of the outer surface of the canoe when it is finished. Now, imagine that hull surface being an even 1/4" thick, which will be the approximate thickness of your finished hull. Now visualize that ALL of the mould, that is the stations and stem moulds must fit INSDE this hull shape, but must evenly and smoothly contact the inside of the hull at all points, because this will be the exact situation that will exist once the hull has been completely planked. The inside stems must also fit exactly to the inside of this hull. And so, the shape of the bevelled surfaces of the stem are exactly the shape of the inside of this 1/4" thick hull.
However, without the finished hull there to guide you, it can be difficult to judge how deep the bevel must be at each point. I find that it helps a lot to be able to draw some pencil lines along the outside surface of the stem to serve as a guide for the proper depth of bevel. We will cover three different situations, the first being the one-piece stem, the second being the two-piece straight stem, and third the two-piece tapered stem. These descriptions will start out simple, but then get a bit more complicated, but I think if you read through it all, it will start to make sense.
First, the one-piece stem. Start by drawing the centerline along the outside of the stem, if you haven't already. Along the 'vertical' portion, draw parallel lines 1/16" on both sides of the centerline. This describes a 1/8" wide leading edge, which is a practical minimum width without making the ends of the finished canoe too sharp and delicate. As you go around the bend, blend these two lines into the centerline a few inches past the end of the bend. Along the keel line portion of the stem, as the vee-shape of the hull begins to flatten out, the strips will start to meet at the centerline, and so by that same point, the bevels on the stem should meet at the centerline.
When you are planking the hull, the ends of the strips along the vertical portion must be trimmed flush with the leading edge. Than, when you are sanding the hull after planking, the leading edge strips should be nicely rounded over to finish. Do not extend the strips past the leading edge to try to form a sharper edge. If a sharper edge is your intention, then thin down the stem some more instead.
Here, I want to touch on a point which has caused confusion for some when building a boat with one-piece stems. On the plans for the stem moulds, the outermost profile is labelled the "True Keel Line". The near vertical portion of this line is actually at the surface of the stem, and the centerline you draw on the stem would in theory remain visible after planking the hull (before sanding). Some builders have thought that the same is true on the portion of the stem which runs along the keel, and that following that logic, they conclude that the profile line for cutting the station must be incorrect. Actually, the portion of the "True Keel Line" which runs along the bottom of the boat IS NOT the outer surface of the stem, but rather it is the actual outer surface of the hull. It includes the true planking thickness as seen from a straight-on side view of the boat, AND after the sharp Vee of the planking at the centerline has been sanded to a 3/8" radius. This line is provided on the drawing as a reference, but for building purposes, just follow the station cut lines, the indicated stem thicknesses and bevels, and finish with a nice radius when you're sanding the hull, and the shape will work out perfectly.
Second, the two-piece straight stem. This is handled very similarly to the one-piece stem, except now, as you bevel the inside stem, the leading edge must be much wider. The finished width at the leading edge of the inner stem must be the same as the width of the outer stem which will cover it. If you are using strips 1/4 inch thick, this implies that the leading edge of the inside stem at should be 1/4 inch wide also (1/4 + 1/4 + 1/4 = 3/4). However, since you'll be sanding the strips after the hull is planked, say 1/32 to 1/16 per side, I generally increase the stem thickness to suit, so that the outside stem doesn't have to get thinned down to match the sanded strips. So (...here it comes!!), make the leading edge of the inner stem 3/8 inch wide at (3/16 + 3/16 + 3/8 = 3/4). That way, after the outside stem is fitted, there is (in theory) 1/16 inch of strip thickness on both sides of the hull to sand down to meet the outside stem. It works out beautifully.
Then, after your 3/8" lines go around the bend, taper them in so that they meet exactly at the centerline, at the very end of the inside stem. This way, even after bevelling, there will be a narrow strip of the original surface for the entire length of the stem. This is important because that will be your reference surface to control the depth of the slot you will mortise into the strips to fit the outer stem. Another benefit of the 3/8" wide leading edge is that it gives slightly more room inside to enable careful fitting and finishing of the fiberglass on the inside of the hull.
And third, the two-piece tapered stem. This one is exactly the same as the two-piece straight stem, except that the guide lines start at 3/8" apart about half way around the bend, and then taper further apart towards the sheerline. Mark these the 3/8" points on the inner stem first. If the finished width of the outside stem at the sheer is to be 1 1/2", then following the same logic as above, the bevelling guide lines will be 1 1/8" apart at that point (3/16 + 3/16 + 1 1/8 = 1 1/2). Draw lines to connect the 3/8" and the 1 1/8" points. Make sure that the lines are straight, as any wiggles here will stick out like a sore thumb on the finished boat. Now, as you shape the inner stems to fair it to the mould so that the strips lie flat against the stems, your shaped sides must go exactly to these lines. And, there you have it - perfect bevels!
The outside stem is not fitted until after the hull has been completely planked, but not yet sanded. However, there is one preparatory step you should take before completing the planking. Carefully mark a point 1" from the end of the inner stem along the keel, and draw a line across it at right angles. As your planking approaches this point, transfer the line to the outside of the planking. This is the end point of the slot you will mortise for the outer stem. Once the planking is complete, you can no longer see the inner stem, so this is a handy way to mark the spot.
Before starting to fit the outer stem, trim that extra inch off the end to match the slot above. Actually, to ensure a really tight fit, I trim just slightly less than an inch, and then carefully sand the end a bit at a time as I'm test fitting it. The reason that the outer stem is shorter is so that you don't open up a hole where the planking meets the ends of the stems. The outer stem can be any amount shorter, but an inch is a convenient measurement.
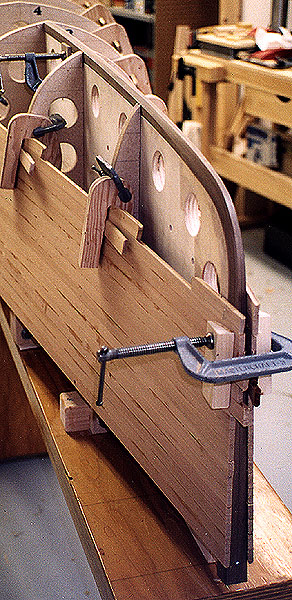
After the planking is finished, come back to the line you drew marking the end of the slot. Mark out the 3/4" width of the outer stem on this line. Then, mark the 3/4" width as far forward as you can. Very carefully draw straight lines to connect these two pairs of points, to mark the sides of the slot. This can be very tricky. I use a flat plastic straight edge from a Tee-square, which can bend a little to follow the rocker in the hull, but you have to be careful that it stays parallel to the floor side to side so that your lines don't get further apart in the middle. Work carefully to get it right.
Next, using a very sharp 1/2" wood chisel, mortise out the slot. The bottom of the slot should be flat side to side, at a depth exactly down to the inside stem but no further. An easy way of getting a very neat, straight edge to the slot you're chiselling out is to use the chisel to get close to the lines, but then finish off with a piece of sandpaper wrapped tightly around a nice, straight piece of hardwood, say 1/2" x 2" x 12" long. This lets you sand the slot out to its final width, with no high or low spots. As you get close to the lines, start test fitting the outer stem and work slowly to get a good fit.
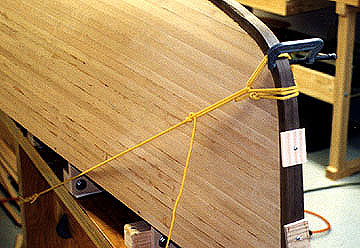
When you can fit the stem into the slot, check for daylight between the inner and outer at the bend. If necessary, you may need to sand a little off the end to be able to push it further along the slot to close the gap. If you have screw holes, you can also use them as a guide. Refer to the photos in Builders Corner on our web site for a photo of a simple clamping arrangement using a rope to get a tight fit at the bend. Once everything fits satisfactorily, glue the stem in place, and secure it with screws or ropes as shown until the glue dries.
The outer stems need to be planed down flush with the outside of the hull, with a nice radius along the centerline. If you used screws during gluing, remove them before planing. The radius should never be much less than 3/8", and of course with the tapered stems, it would reach a 3/4" radius at the gunwales (1 1/2" diameter).
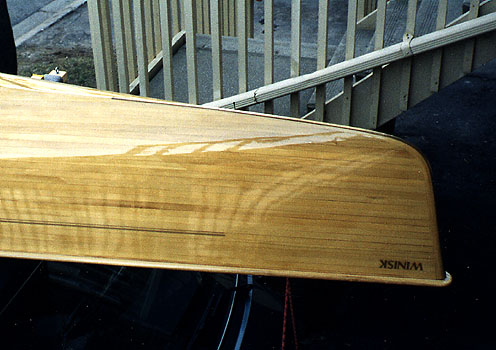
Please note that along the keel line, you will have to plane away at least 1/2" or two layers of the original lamination's thickness. I am amazed at the number of people who thought that the outer stem was intended to stick out, but that is not the case. You start out with three layers of wood in the outer stem because you need all three layers on the vertical part, and because it won't hold a bend long enough to fit it without the extra wood along the bottom. But, when the boat is finished, this extra has to be gone. As a guide to how they should look, I've added three more photos on my website this evening just for you. Look at the Builders Corner on the Green Valley Boat Works web site.
After you have finished planing, make wooden plugs from the scrap cut off ends of the stems which you saved, and plug the screw holes. What is especially good for this is the tapered plug cutters from Lee Valley Tools. The 1/4" size is perfect for the stems, whereas the 3/8" size is great on gunwales where you're hiding screw heads. The tapered plugs give a really tight fit with minimal glue lines.
A number of people has expressed a desire to cut down the height of the inner stem, so that it doesn't stick up as far into the inside of the boat. This would have to be done after the hull has been built, because if the inner stem is reduced in thickness beforehand, it will not hold it's shape. Also, it would not fit properly on the stem mould, and the external lines would be incorrect. Also, if you intend to plane the inner stem down somewhat, you will probably want to avoid screwing the inner and outer stems together during construction, or else the screw holes will be exposed as you plane. In general, I would recommend against cutting the stem down. It is not unattractive as is, and it provides extra strength and sufficient thickness to permit the installation of metal stem bands on the outside of the hull.