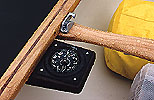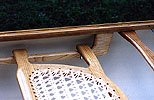


One of my 'trademark' features on my canoes is that all the hardware used to install the seats, thwarts and the portage yoke are completely hidden - there are not even any wooden plugs used to cover screw heads. This can be seen in the photo of my special seat design on the Green Valley Boat Works home page, and in the two photos above of my recently completed Osprey. Admittedly, this look is not for everyone, and it's neither particularly cheap, nor easy. Still, a lot of people have asked how it's done, so, if you're up to it, here goes...
If you look closely at the photos, you'll notice that you can't see the hardware holding the seats and thwarts. These items are held in by stainless steel 6 mm socket head cap screws (M6 x length SS SHCS) from underneath into blind holes in the gunwales, with locking HeliCoils that are preinstalled at all the correct locations in the inner gunwales before the gunwales are installed. (Whew!)
I use 6 mm because they are the only screws of this type which I have found readily available in longer lengths, up to 150 mm (6 inches), making them suitable for seat hangers. I did use two even longer, but I got a welding shop to cut and lengthen a couple. The 6 mm is a little smaller than 1/4-20 UNC, but larger than #10-24 UNC, which are the two most common sizes used for this purpose. I counterbore the holes into the bottom of the seat or thwart so that the heads will be recessed and hidden when viewed from above. Make the counterbore diameters large enough to use heavy SS flat washers under the screw heads. Make the counterbore holes 1/2 inch diameter. Drill the c/b's with a brad point drill or at least a spade bit, so the bottom of the c/b will be flat, not conical.
The HeliCoils are stainless steel thread inserts normally used for repairing engines or machinery (this is a brand name - do not substitute). Use the locking variety so the screws don't come loose. These are not usually carried locally, but I get them mail order from Reid Tool Supply Company at 1-800-253-0421 (free catalogue). You'll need their Kit No. TI-5520 ($38.05) and also about 18 to 24 of the locking inserts TI-3710 ($0.71 ea) (the HeliCoil part no's are 5403-6 and 1084-6CN-120 respectively.) If you want to use the more readily available standard (free-running) HeliCoils, coating the threads of the screws with silicone sealant on final installation should stop them from coming loose, as well as waterproofing the wood.
As for the screws, I buy mine from Spaenaur in Kitchener, Ontario from page B 253 in Catalogue No. 12. Their phone number is 1-800-265-8772 and their fax is 519-744-0818. The M6 SS SHCS screws come in millimeter lengths of 8, 10, 12, 16, 18, 20, 22, 25, 30, 35, 40, 45, 50, 55, 60, 65, 70, 75, 80, 90, 100, 110, 120, 130, 140 and 150mm.
I use Helicoils instead of other inserts for a number of reasons. They require the smallest hole in relation to their nominal size of any insert. They are the strongest, with the widest range of sizes, you tap the holes rather than force them in so no danger of splitting the wood, they are stainless steel so no corrosion, the are available self-locking, etc, etc. When you finally install the seats, etc, remember to put some silicone on the screw threads to seal out water.
To use HeliCoils, you'll have to plan ahead very carefully. You must have your seats, thwarts, yoke, and whatever already made up by the time you are ready to install the gunwales. When you dry fit the inner gunwales, you'll have to very carefully determine exactly where each part will attach. Of course, this method puts a lot of stress on the wood, so your gunwales should be hardwood - ash, cherry or mahogany - this is not the place to use spruce.
Remove the gunwales from the canoe, and drill and tap and install the HeliCoils into the gunwales from the bottom while they're off the boat. You must work carefully, because one mistake and you could ruin a perfectly good set of gunwales. I normally mark the installation points on only one gunwale, and when they are off the boat, I clamp the two gunwales together to transfer marks from one to the other for a perfect match. The strongback is the most useful place to do this work. The HeliCoils are 12 mm long, or about 1/2 inch. In order to get sufficient depth for tapping (threading) the hole, plus to get a little extra clearance for the end of the screw, drill the holes to 5/8 inch depth. This means that your gunwale stock must be at least 3/4 inch in height at the absolute minimum. I use 7/8 inch high x 3/4 inch wide gunwales. When you're screwing in the HeliCoils using the tool that is part of the kit, turn them in until the top thread is about one thread below the surface of the wood. You must remember to break off the tang on the inside end of the heliCoil once its in, and turn the gunwale over and tap it to shake the broken tangs out.
You must also have paid attention to how each component fits up to the gunwale to get the hole alignment correct. I would strongly recommend that you use a drill press to drill the HeliCoil holes, using some temporary guides clamped to the drill press table, in order to get each hole exactly the right depth , alignment and spacing from the edge.
Also pick up some 6mm set screws to temporarily plug the holes to prevent varnish and stuff from clogging up the threads before you install the seats, etc.
Each component can be easily installed or removed with only a 5mm Allen wrench, a.k.a. a hex wrench. For a little faster work, use a 1/4 inch drive 'Snap-On' type socket wrench with a 3 inch extension on a flex joint, with a 5 mm hex bit socket. I find that a small pocket mirror makes it a lot easier to locate the screw heads under the gunwales. So, have fun, and let me know how it turns out for you.