The subject of gunwales has also generated a lot of questions, ranging from the simple to the complex, and there are numerous possible variations. This is intended as a general guideline, and largely reflects my own tastes. You are free to make changes, but if you do, please keep in mind that regardless of the form your gunwales take, they still have to perform a number of key functions.
First of all, gunwales must stiffen, strengthen and protect the edges of the hull to help hold the shape of the boat and preserve it under all foreseeable uses and abuses. Second, gunwales must be strong enough to support the seats, thwarts and other trim under all reasonable conditions. Third, the outer gunwale protects the edge of the hull from damage and deflects water from entering the boat when waves splash against the sides. The gunwales also serve as a convenient hand hold when the canoe is being carried or lifted. If you choose to radically modify the gunwale design on your canoe, make sure that it can still adequately fulfill these design functions. In this section, we will cover the following topics:
- wood selection:
- finished dimensions:
- oiled vs. varnished:
- scuppered or tapered gunwales:
- edge of hull treatment:
- Martin's special inlay:
The most common woods used are White Ash, Cherry, and Mahogany. Each of these are strong and durable, and are generally available in long, clear lengths. In general, softwoods are unsuitable because they will not take the wear and tear. However, one exception may be made for Sitka Spruce, which is used if very light weight is of primary importance. I have seen one compromise solution which John Winters has used a few times, which is very interesting. It consisted of Sitka Spruce with an inner and outer 1/8" lamination of mahogany on the inside and outside vertical surfaces of the inner and outer gunwale respectively. By the way, you may wonder at my use of the terms 'inner' and 'outer' gunwales as opposed to 'inwale' and 'outwale' - I don't know if it is technically correct or not, but it works better to my ear. Since gunwale is pronounced "gunnel", I can't begin to fathom (no pun intended) how to pronounce 'inwale' or 'outwale' so that it sounds right.
Many people has said that they cannot get the wood for the gunwales in long lengths, and ask about substitutes. I think getting the right wood is more important than getting it full length in one piece. No reason you can't do a 6:1 scarf joint with epoxy cement to make up long pieces. Get a nice piece of white ash, or black cherry or similar, and put them together. If it's done neatly, one or two scarf joints will even show off your workmanship.
This isn't hard and fast, but what I use on a large canoe is sized as follows...
Inner gunwale... 1" high x 3/4" wide, or up to 1/8" less both ways.
Outer gunwale... 5/8" high x 3/4" wide, or up to 1/8" less both ways, with the outer edge rounded.
Keep in mind the intended functions, and don't cut them down too much. The length should be about 1 foot longer than the canoe, or a bit more if you're going to make my special wrap-around ends.
The choice will be affected mainly by how you normally treat your gunwales. If they typically get a lot of wear and tear from paddles, portages, and other heavy use, then go with the oiled finish.
If you will be treating the gunwales with care, and want the very best in appearance, then varnish. IF you varnish, the entire piece of wood, including the inside face, needs to be sealed to protect from moisture entry.
On your canoe, if you've screwed the gunwales to the hull, you can do either oil or varnish. If you want to varnish, take the gunwales off first, and seal the backside of the wood to prevent water entry, using several coats of thinned varnish so that it will soak in. Or, if you view the gunwales as a permanent part of the boat, you can glue and screw them to the hull using thickened epoxy. This not only seals the wood, but adds a lot of strength. Then, after reinstallation, curing of the epoxy for 1 to 2 days, and sanding, you can varnish. If you have some System Three Clearcoat epoxy, you can apply one or two coats to the bare wood first, let cure and sand smooth. This adds time, but, gives a harder finish, and it will take only a few coats of varnish to build up that deep, glossy coat.
Scuppered or Tapered Gunwales:
Scuppered or tapered gunwales are more work, but save a little weight, and are largely a matter of personal preference rather than necessity. Scuppered gunwales derive from the old cedar canvas canoes which had ribs, and the scuppers were formed naturally by the spaces between the ribs. On a modern canoe, you have to form the scuppers by routering or by using spacers, and personally, I think it looks out of place, like whitewalls on a Porsche, but that's just my opinion. (If you must have scuppers, I think the routered ones look best, but it will be your choice.) With woodstrip, fiberglass and epoxy construction, all of the wood is encapsulated in epoxy, so scuppers are not needed for drainage. Although there is a bit of weight saving, you also lose a bit of strength because the gunwale is not in continuous contact with the hull, so why not just make the gunwale a bit thinner in the first place. Lastly, if you want to have a nice varnish finish, it's that much harder to do with scuppers, and yes, they would have to be varnished inside as well. But, if you must have scuppers, plan ahead so that you will have solid wood at all the points where seats and thwarts will attach to the gunwales.
It is easier to make a good case for tapering the gunwales, for looks and weight loss. Keep in mind that it is primarily the inside gunwales which would be tapered, and that it is a lot of extra work. To look good, the taper should be long and gradual, extending to at least 1/4 of the length of the canoe from each end. It loses a lot if you just taper the last foot or so. One word of caution, however: if you are going to have tapered stems, which means the stems get WIDER at the gunwale, you had better not taper the gunwales too much, or they won't meet at the ends.
The most common method simply sandwiches the edge of the hull between the inner and outer gunwales, leaving the edge exposed. This works fine, especially with varnished gunwales. However, with oiled gunwales, make sure you renew the treatment often enough to ensure that there is no moisture entry into the exposed edge of the hull.
Another common method involves covering the exposed edge of the hull with part of the gunwales. The inner gunwale is made wider by the thickness of the hull plus a bit, and is then rabbetted on the face that contacts the inside of the hull to accommodate the hull thickness. This leaves an extended lip of about 1/8" thickness and 1/4" width which will cover the edge of the hull. After it is installed you can plane the lip flush with the hull. Then, install the outer gunwale to finish the job. Note that unless your gunwales are to be glued and varnished, you still will have to put a couple of coats of varnish along the edge of the hull first to seal it from water. Also, note that if you reverse this and make the lip part of the outer gunwale, it may be more work to plane the lip flush for final fitting.
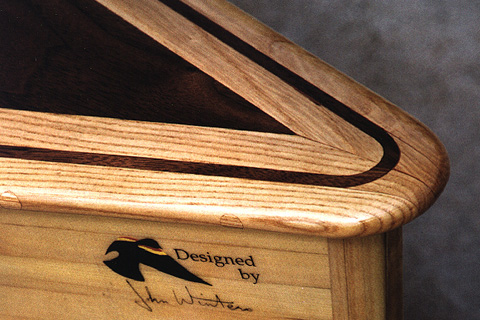
The edge of the hull can also be covered with an inlay of contrasting wood, as I do with my canoes, which I combine with my trademark wrap-around ends on the gunwales. A part of this process involves cutting down the ends of the stem so that they are not visible from above. I must caution you that this is complicated, and it's a lot of work! In fact, I would say that in this case, it's HARDER than it looks! If you don't think your skills are up to it, take a pass on this one. Also, by it's nature, it's a method only to be used with glued and varnished gunwale systems, and also it looks best with tapered stems. However, many people have asked for details, so here goes...
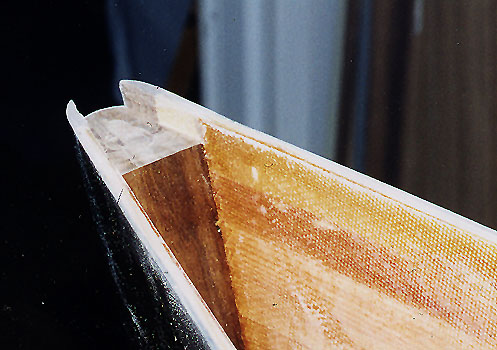
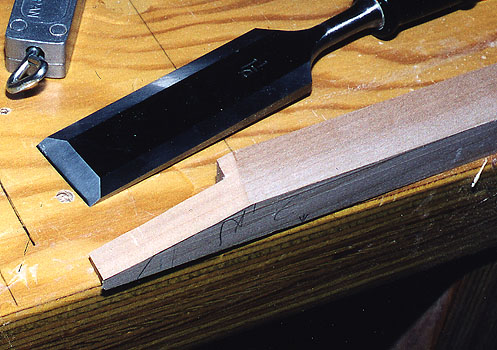
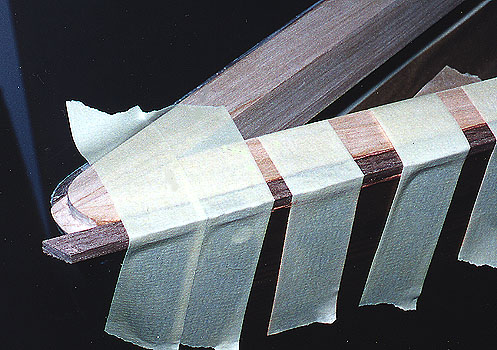
In order to run the inlay and the gunwales around the ends (this is one of my special trademarks!) you need to plan ahead. After the hull is done inside and out, cut the ends of the stems down about 3/8 inch with a chisel or router as shown in the photo at the far left below. Take care not to cut down the planking, OR that portion of the outer stems which are directly in line with the planking. When you are fitting the inner gunwales, you must start out with gunwales at least 6 to eight inches longer than you really need. Carefully determine the length you need for the boat, and add 1/2 inch or so, and then cut the extra off, equally divided between the two ends of the gunwale. Prior to cutting, mark these pieces for position and orientation relative to the gunwale, and set them aside. Then, you must notch out the BOTTOM of the ends of the gunwales as shown in the second photo below so that the remaining portion exactly fills that 3/8 inch deep notch at the ends of the stems, overlapping the stems and hiding them as in the third photo below. This is tricky, because those are all compound angles. Work carefully and plan ahead.
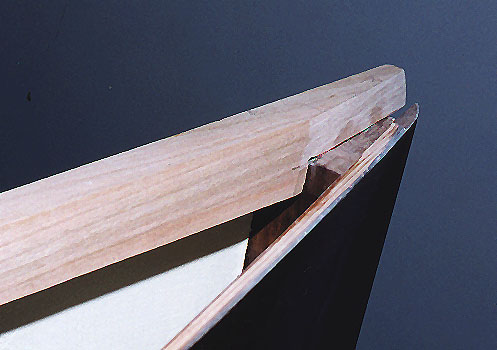
After the inner gunwales are installed, cut the ends flush with the end of the boat, following the rounded outside contour of the stems. Mark a line around this end, on the top surface, 1/4 inch from the edge, and chisel it down until its at the same height as the edge of the hull to form the channel for the inlay to run around the ends as shown in the first photo below. When you are gluing in the walnut strips, have ready some very small pieces precut and shaped to fill this area at the ends, maintaining grain alignment parallel to the strips along the sides. (This is too tight a curve to steam bend a strip.)
The 1/4 inch wide strip is an inlay, but its not installed like an inlay. I get strips of walnut cut about 1/8 x 5/16 x 3 or 4 feet long. When I install the inner gunwales, I leave them about 3/32" higher than the edge of the hull. I scarf the ends of the walnut strips with a jig on my belt sander so that the joints between pieces of inlay will have a nice appearance. I glue the strips onto the edge of the hull against the inner gunwale using epoxy thickened with West System type 407 filler, which is reddish brown, same as walnut. I use numerous pieces of masking tape to hold the strips in position till the glue sets. The strips are about 4 inches long, stuck to the side of the boat in advance for quick access. I use a piece about every three inches, but then I go BACK over the whole section, remove a few pieces at a time and wipe off the squeeze out with a bit of lacquer thinner, and put on fresh pieces of tape. I do one whole side of the boat at one time, but you need to work smoothly and quickly before the glue sets up. In fact, after mixing up the glue, with 1 shot of resin and hardener and about 4 heaping tablespoons of filler, you must quickly spread it out along the entire length of the gunwale, and then come back and trowel it even. Otherwise, it will set up too fast to get the one side done. When the glue is cured, you carefully plane the strips flush with the outside of the hull. After the outer gunwales are installed, you plane the strips down flush with the tops of the gunwales.
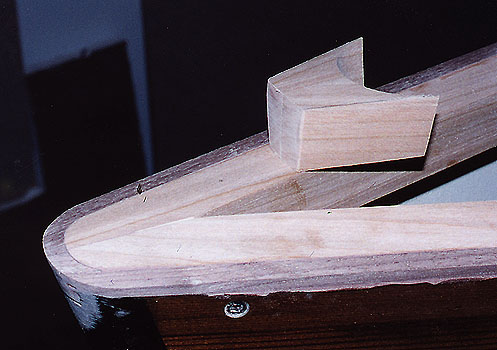
During the course of installing the outer gunwales, use the cut-off ends of the inner gunwales to make up a plug to go between the ends, as shown above before installation, matching up the pieces so that they look like extensions of the inner gunwales. (No, you can't just leave the inner gunwales longer in the first place. That would leave a hull-thickness gap between the outer gunwales and the inner gunwales at this point.) The angles are the same as on the boat, which you can transfer with a carpenter's sliding bevel gauge. The width should be a little more than what you need, to allow a little clean up of the sides once it's glued into position. The easiest way to round out the inside is on a spindle sander, but I've also used a small drum sanding attachment on a drill, and a Dremel for roughing it out. You've got to work VERY carefully for all the angles to work out, because you've only got one set of matching wood pieces to work with. If you're not up to it, maybe it's best not to try this method.
To install these plugs, I find it's easiest to do before the outer gunwales are added. Dry fit the outer gunwales, and tape a couple of stir sticks to the hull at the bottom edge of the outer gunwale, so that the stick extends past the end to where the plug will be. Then, remove the outer gunwales, and glue the plugs into place, with them resting on the sticks, and taped to the hull to hold them until the glue sets. Plane and sand the edges of the plug into line with the hull, and then install the outer gunwales permanently. Plane down the top of the plugs to suit, and then shape the ends as in the top photo above.
To do this well is fairly difficult. Still want to give it a try? Plan every move out before you cut anything - make certain you understand fully every step before you begin. The ultimate version of this method involves having the four gunwales cut from one fine plank, in their final position and relationships, so that all the grain on the four pieces matches up from inside to outside, and at the ends where they all come together. Look closely at the photos.
Some folks have commented that when using this method, the sheer line for the canoe will be 3/32" higher than indicated on the plan. First of all, that little difference in sheer line height is insignificant. Second, if you're using bead and cove strips, you'll be planing off the 'bead' portion at the sheer line after you have fiberglassed, which pretty well takes care of the 3/32". So, have fun, and let me know how it turns out.